Cooking with Butter...Land O Lakes Cookbook Reviews

When you are talking about cookbooks using butter, anyone in the Midwest would think Land O Lakes.
I love almost any of the Land O Lakes cookbooks, either the two large ones; or any of the softcover booklets that they have put out. 
What I like about their recipes, besides the fact that they use butter, is that the recipes always work, with clear directions that make the recipes useful to experienced and new cooks alike.
If you get a chance to pick up one of these cookbooks at a book sale, thrift shop, yard sale or see them in the library, they are worth the money.


Two of my cooking “bibles” are Land O Lakes Treasury of Country Recipes and Land O Lakes Treasury of Country Heritage Meals and Menus.  They are big, hardcover books filled with great recipes and beautiful photos.  They just make you want to start cooking.


Two of their soft-cover booklets that I like best are Land O Lakes Comfort Foods and Land O Lakes All-Time Favorites 75th Anniversary. 

Some recipes to try:


Butter Cream Baked Apples

Spaghetti with Olives and Capers


When you are in a hurry this is an easy filling meal. It calls for store bought Marinara Sauce. Yes, there are lots of good recipes out there for homemade sauce, but as the purpose of this recipe is to get a meal on the table quickly we will go with the canned. 
 After making this several times, I made regular spaghetti sauce and everyone complained and asked for the OLIVE sauce instead. Do use the capers, a little less than called for the first time if you are new to them, but as they taste like olives they just add to the flavor. I use the Sherry as we feel it adds to the taste, but it is optional. Serve with a green salad and garlic bread and you have dinner in less than 30 minutes. The original recipe came from a Cooking Light magazine, but I have altered it to suit our tastes. 
Barilla makes a good Gluten Free Spaghetti which is what I use. Now that I am cooking for one I make the sauce and freeze it in one portion sizes. Then all you have to do is cook spaghetti and heat up the thawed sauce. 

Spaghetti with Olives And Capers
8 ounces thin spaghetti
1 tablespoon olive oil
2 cups chopped onion (I use less as we feel 2 cups is too much)
2 teaspoons minced garlic
1 teaspoon dried oregano
1/2 teaspoon celery salt (Do not leave out, this adds to the taste)
1/4 teaspoon crushed red pepper
1/4 teaspoon freshly ground black pepper
8 ounces extra-lean ground beef
1 2/3 cups marinara sauce in a jar or can 
1/2 cup sliced pimiento-stuffed olives*
1/4 cup dry sherry
1 tablespoon capers
1/4 cup chopped fresh parsley, divided
Heat oil in a large skillet over medium-high heat. Add onion to pan; saute 4 minutes or until tender. Add garlic; saute 1 minute. Stir in oregano, celery salt, red pepper, black pepper . Crumble beef into pan; cook 5 minutes or until beef is browned, stirring to crumble. Stir in marinara sauce, olives, sherry, capers, and 3 tablespoons parsley. Bring to a boil; reduce heat, and simmer 15 minutes. While sauce is simmering cook pasta according to package directions, omitting SALT; drain. Or as I do, just use tongs to lift into the sauce. Add spaghetti to sauce mixture. Sprinkle with remaining 1 tablespoon parsley.
Yield: 4 servings (serving size: about 1 3/4 cups)
CALORIES 445 ; FAT 12.1g (sat 3g,mono 5.9g,poly 0.8g); CHOLESTEROL 21mg; CALCIUM 72mg; CARBOHYDRATE 60.6g; SODIUM 832mg; PROTEIN 22.3g; FIBER 5.4g; IRON 5.2mg 

*For a few cents more, you can buy the olives already sliced. After trying to slice rolling olives, I opted for the pre-sliced. Saves time and fingers.

Memorial Day...


Old White Cemetery  
Oskaloosa, Iowa, just north of William Penn University campus; the cemetery was started in 1848

We hope you will set aside a little time tomorrow to remember with us...
those who have served and those who still do.

Buying Butter


When you go to the store to buy butter do you stand there and wonder what to buy? Brand wise, I buy the store brand for everyday and Land O Lakes when I am making recipes that really depend on the butter for the taste. Sue buys Troyer Roll Butter at Cantril for table use, excellent butter especially for someone who always has fresh bread to eat, and she buys store brand for most baking and cooking. I am not a fan of the cultured butters as I really don’t care for the tangy taste of it. Which includes the Irish butters and most European types.

 The cooking shows now days tend to push the high end and expensive products. They certainly are good, but not necessary to buy. Buy what your budget can handle. It is still going to taste much better than Margarine and not have all the chemicals added to it.

 Sue and I can still remember going to our local  Dairy and buying butter for our Grandmother. It came in a crock and you had to have one to return or they wouldn’t give you another one. As I recall it was very good butter. We had a tabletop glass churn (that was when milk had cream on top to the bottle) but only our Dad had enough strength to finish it at the end. We didn’t use it much.

 Some of the types you will see in the store are these.

Unsalted butter: Sometimes called “sweet cream butter,” this is the most versatile variety.

Salted butter: Just like the unsalted but with the addition of salt. Many people reach for this when buttering bread. I use it with most recipes calling for unsalted.

Whipped butter: This variety has air or some other gas, such as nitrogen, added to it to make it less dense than standard butter, so a little goes a long way. The increased volume results in fewer calories per tablespoon (often half) and a lighter texture. It is not recommended for baking or cooking.

European-style butter: Loaded with extra milk fat—82 to 85 percent for most brands—European-style butter has less moisture than standard butter. Because it is made with fermented (also called “cultured”) cream, it has a slight tang. European-style butter can be used for all cooking tasks.

Spreadable butter: A combination of regular butter and vegetable oil (and sometimes other flavorings and fillers), this product maintains a soft texture even when refrigerated. It is not recommended for baking or cooking.

Light butter: This option has half the calories of standard butter because it contains less milk fat—40 percent at most. The rest is made up of water, lactic acid, and other fillers. It is not recommended for baking or cooking.

Butterlike spread: Often marked with the label “buttery spread,” this has a similar soft texture to spreadable butter but contains far less real butter—at most 5 percent and sometimes none at all. Instead, it is made primarily from a blend of vegetable oils and other fillers. Its benefits include fewer calories, less fat, and just a trace amount of cholesterol. It is not recommended for baking or cooking.

Ghee is usually available in high end markets and box stores. I have seen it at smaller chains also, just not all the time. It a version of clarified butter.


You can store your butter in your freezer for a longer time...this is Sue's upright freezer door!

Special Broccoli Salad


I found some fairly good-looking broccoli in the produce section today...just had to buy some!
This salad isn’t anything new, but it’s often made with too thick mayonnaise. We like this thinner, sweeter version – it reminds us of the salad we enjoyed at a resort restaurant, where they said they used a purchased Vidalia onion poppy seed dressing.  I made mine without the bacon or grapes, but they are a nice addition.
Broccoli Salad
¼ cup sunflower seeds -- toasted lightly
½ cup Sour Cream -- or heavy cream or combination
½ cup sugar
¼ cup cider vinegar
1 teaspoon poppy seeds
1 ½ Cups Broccoli Florets -- fresh, cut up into bite size pieces
½ cup Onion -- red or sweet, finely chopped
½ cup celery -- thinly sliced diagonally
½ cup Raisins
2 Slices Bacon -- optional, crisp pieces
½ Cup Grapes -- optional, red or green, halved
  1. Toast sunflower seeds on a small shallow pan in the oven - watch closely or on a shallow microwave plate in the microwave a minute at a time until done. Cool. 
  2. Combine cream, sugar, cider vinegar and poppy seeds and shake or stir well.
  3. Pour dressing over other ingredients in a 1 1/2 quart bowl. Stir gently to combine. Chill. If desired, stir in bacon before serving.
Yield: "1 Quart" or 6-8 servings.

Sunday in Iowa...


On the edge of Hedrick, Iowa

This huge barn is falling down now, but the design is very interesting

Caramel Buttercream Frosting

 “The icing on the cake” expression says it all. It is used to describe over the top things or what makes them over the top and no wonder as the icing (frosting) is what makes a cake. 
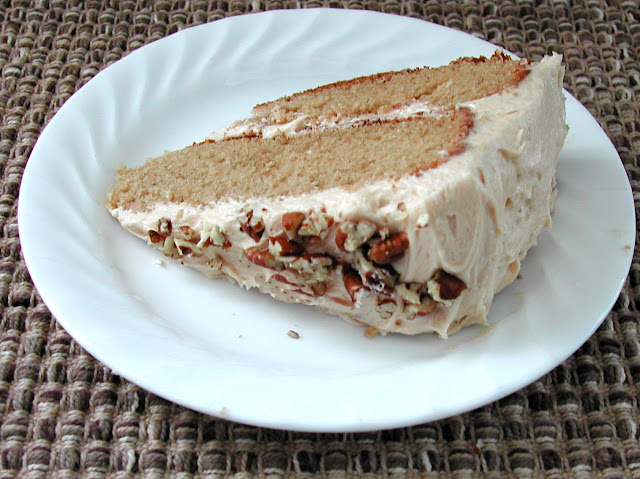
For the spice cake I made I tried this recipe for Caramel Butter Cream Frosting. I think I got it from Southern Living but as I have had it for awhile I am not sure. It is excellent though a little time consuming to make. I will save it for when I want a special cake just because of the time and labor involved, maybe. 
 The thing that takes the most time is that you make the caramel and it needs to cool for an hour. However if you do this while the cake is baking they can both cool at the same time. Never frost a hot or warm cake unless the recipe calls for it as the icing will disappear into the cake.  Do Not stir the caramel in the pan after it comes to a boil or it will sugar on you, just gently swirl it in the pan once or twice. Once it starts to darken it will go quickly so at that point you need to keep an eye on it.

Caramel Buttercream Frosting
  • 1 cup granulated sugar 
  • 1/3 cup water 
  • 1/3 cup heavy cream 
  • 1/4 cup butter, chilled and cut into 1⁄2-inch pieces 
  • 1 cup butter, softened 
  • 4 ounces cream cheese, softened 
  • 1/2 teaspoon vanilla extract 
  • 1/4 teaspoon salt 
  • 4 cups unsifted powdered sugar, divided
  • Prepare the Caramel for the Buttercream: Place granulated sugar and water in a small saucepan; cook, stirring often, over medium-high, until sugar dissolves, about 1 minute. Bring to a boil over medium-high. Cook, without stirring but swirling pan occasionally, until mixture is deep amber in color, about 10 minutes. Remove from heat; quickly add cream in a thin, steady stream, stirring constantly with a wooden spoon. Stir in chilled butter until mixture is smooth. Transfer caramel to a small bowl to cool completely, about 1 hour.
Beat softened butter and cream cheese in bowl of a heavy-duty stand mixer on medium speed until creamy, 3 minutes. Stir in vanilla and salt. Gradually add 2 cups of the powdered sugar, beating on low speed until smooth, 2 minutes. Add cooled caramel; beat on medium speed until combined, 2 minutes. Gradually add remaining 2 cups powdered sugar, beating on low speed until combined. Add more powdered sugar if needed.

Spice Cake Gluten Free


I ran across this recipe for a good looking frosting and decided I wanted to try it. Of course you have to have something to put frosting on and as a Celiac I don’t eat cake. There are GF cake mixes on the market but they are very expensive and seldom good. I have been very pleased with the Chain store Aldi’s GF products and my daughter Amy who is also Celiac had tried one of the cake mixes and thought it was good. 
 With that recommendation I went with their yellow cake mix. The box says yellow baking mix but it is a cake mix. The only problem came from the fact that I wanted to make a spice cake as the frosting was Caramel Buttercream. I didn’t find a spice mix so went with the yellow and turned it into a spice cake by using it as the base and using the spice additions from a 1964 Better Homes and Gardens cookbook where they were giving directions on changing a yellow cake to a spice cake though of course their cake was from scratch. 
 The cake turned out quite well so here is what I did and you could do it with any cake mix GF or regular.
 Spice Cake Gluten Free
1 box of GF yellow cake mix
1 teaspoon cinnamon
½ teaspoon ground cloves
¼ teaspoon allspice
1 tablespoon molasses
 Directions
Following the mixing directions on your cake mix add the spices to the dry ingredients.
Pour the molasses in the measuring cup before measuring the liquid ingredients for your cake mix. If you don’t have allspice on hand or don’t like it substitute nutmeg or just omit it.

 Bake as directed by the cake mix you are using.

Cooking with Lard...Orange Lard Cake


I’ve been thinking about making a lard cake since I first saw a page of recipes for them in the Old Fashioned Recipes section of the "Farm Journal Country Cookbook ."   In my 1959 version, the cakes are made by the conventional creamed method.  In Myrna’s newer book, the lard cakes are made by the “meringue” method, separating the eggs and whipping the whites; then folding the batter into the whites and baking.  I choose this method because I thought the cake would be lighter, and we were very happy with the result.
The cake was light, moist, tender  and delicious.  I believe that I’m going to have to try the Chocolate, Spice, Yellow, and Fudge Pudding recipes too.  My husband, not a usually a cake fan, really liked this one.
I added some of my shredded orange peel to the frosting, and next time, I think I will add it to the cake.
I made a half recipe in a square pan for a picnic cake, and I’m giving that recipe here.


 Orange Lard Cake

  1           large  egg -- separated
     1/4    cup  sugar -- 1 3/4 ounces
  2  1/2   tablespoons  lard
  1 1/8    cups  sifted cake flour -- 4 1/2 ounces
     1/2    cup  sugar -- 3 1/2 ounces
  1 1/4    teaspoons  baking powder
     1/2    teaspoon  salt
     1/8    teaspoon  baking soda
     3/8    cup  Whole Milk
  2           tablespoons  orange juice
     1/8    teaspoon  almond extract        
Let egg come to room temperature.  Prepare pan.  Measure and sift dry ingredients together.  Set aside.
Beat egg white until frothy.  Gradually beat in 1/4 cup sugar.  Continue beating until very stiff and glossy.
In another bowl, stir lard to soften.  Add sifted dry ingredients and milk.  Beat 1 minute, medium speed on mixer.  Scrape bottom and sides of bowl constantly.
Add orange juice, egg yolk and almond extract.  Beat 1 minute longer, scraping bowl constantly.
Fold into egg white mixture.
Pour into 1 greased and floured 9" round layer cake pan or 8” square pan.
Bake in 350° oven 25-30 minutes.
Cool layers in pan on rack 10 minutes; then remove from pans.
  
Orange buttercream frosting
     1/4   cup  butter
  1 1/2   cups  powdered sugar -- 6 ounces
  2        tablespoons  Heavy Cream
  1-2     tablespoon  Orange Juice
  1        teaspoon  Orange Rind -- finely grated

Cream butter, gradually add powdered sugar with cream and orange juice until mixture is light and fluffy.  Frost cake.

Puff Pastry Taco Foldovers

This is an easy version of Tacos we like. It is not as messy and hard to eat as hard shell tacos. The recipe is from the Pepperidge Farm web site.
The taco filling needs to be cool so you could make it ahead even have it in your freezer. The puff pastry needs to thaw for about 40 minutes so you can thaw the taco meat at the same time or make it and cool while the pastry is thawing. Puff pastry is one of those things that you do not need to make from scratch. The store bought dough is good, easy to use and not that expensive.
Taco Foldovers
Ingredients
1 lb. ground beef
Chunky Salsa
1 pkg. (1.25 ounces) Taco Seasoning Mix
Water
1 pkg. (17.3 ounces) Pepperidge Farm® Puff Pastry Sheets (2 sheets)
1 cup shredded Cheddar cheese (4 ounces)
1 egg
1 tbsp. water
Directions
Cook the beef in a 10-inch skillet over medium-high heat until it's well browned, stirring frequently to break up the meat. Add 1 cup of the salsa, taco seasoning and water according to the package directions. Cool completely.

Thaw the pastry sheets at room temperature for 40 minutes or until they're easy to handle. Heat the oven to 400°F. Line two baking sheets with parchment paper or spray with vegetable cooking spray. Stir the egg and water with a fork in a small bowl.

Unfold 1 pastry sheet on a lightly floured surface. Roll the sheet into a 14-inch square. Cut into 4 (7-inch) squares. Repeat with the remaining pastry sheet. Place about 1/3 cup of the meat mixture onto half of each square. Top each with 2 tablespoons of the cheese. Brush the edges of the pastry with water. Fold plain pastry half over meat mixture and press the edges with a fork to seal. Place the rectangles on the prepared baking sheets. Brush with the egg mixture.
Bake for 20 minutes or until golden. Let cool for 5 minutes on a wire rack. Serve warm with additional salsa.

Cutting this recipe in half and just using one sheet is something I do a lot of times, however, they warm up well the next day for lunch. The filling can be frozen if you are going to only use half and then you are ready for the next time.

Sunday in Iowa...


Tulip Time in Pella, Iowa  
Garden beds on the town square

Cooking with Lard...Never Fail Lard Biscuits


After I found a good source for lard I turned to my 60’s and 70’s Farm Journal Cookbook collection, where lard is listed as the FIRST choice of fat in this recipe for biscuits. They called them “never fail” so I figured I couldn’t go too far wrong.  At about 7¢ you can't beat 'em.


I keep the lard I am currently using either in a fruit jar or a covered measuring cup in the refrigerator. It was cool when I measured it out for this recipe; I think that made it easier to cut in.  
I cut the recipe in half for the 2 of us, expecting some leftovers. Wrong this time! My husband’s first comment was “Now THIS is GOOD!” The biscuits are very light, as you can see, tender, but not crumbly. Even the ones I patted out to use the scraps were tender. The dough is very easy to work with, I sprinkle my board with flour I keep in a $5 stainless steel shaker for making pasta.
If I’m in a hurry, I just cut my biscuits into squares with a sharp bench knife. If you use a cutter or knife, be sure to cut straight down; do not twist, to get a good even rise and that “split” in the middle of your biscuit.


Never-Fail Baking Powder Biscuits

2 cups Flour, All-purpose – sifted (9 ounces)
1 tablespoon Baking Powder  
1 teaspoon Salt
1/3 cup Lard
3/4 cup Milk  

Sift dry ingredients together. Cut in lard until mixture resembles coarse meal or crumbs.
Make a hollow in the flour-shortening mixture and stir in enough milk to make a soft dough that leaves the sided of the bowl and sticks to the mixing fork.
Turn onto a lightly floured surface and knead with the heel of the hand 15 times. Roll 1/2" thick.
Cut with a 2" cutter; place close together on a baking sheet for soft sides, 1" apart for crusty sides on ungreased baking sheet. I use parchment paper.  Bake in very hot oven (450°) for 10-12 minutes. Serve at once.
If using self-rising flour, omit baking powder and salt.

12 biscuits          
"Homemade Bread" By Farm Journal - 1969

March 2019 cost: 7¢ per biscuit

Per Serving: 124 Calories; 5g Fat (36.5% calories from fat); 3g Protein; 17g Carbohydrate; 1g Dietary Fiber; 6mg Cholesterol; 307mg Sodium.