Family Favorites Columbian Chicken and Rice

You can serve it right from the pan

 Colombian Chicken and Rice from the Basics and More Cookbook of Sue’s. With the addition of Honey Cornbread this is a simple meal to fix and eat.
 Do not add the tomatoes till near the end so that they stay in nice diced pieces and do not turn into mush.  I sautéed the vegetables slightly, added the chicken to warm it and stirred in the cooked rice that I cooked in the broth.
  If you do not have the broth from the chicken, use a can of chicken broth and enough water to equal two cups. 
 Many of the older recipes cooked things to death, and we felt this was very good this way. Made on the stove, it is a quick and good for you meal. Your family will be pleased with you. Try adding black olives either with the green olives or alone for a different taste. If using black olives, you might want to add some pimentos. 
Colombian Chicken and Rice
2 Tablespoon butter
3 fresh tomatoes, peeled and diced
1 green pepper, chopped
1 clove garlic minced
1 cup dry rice
1 ½ cups cooked chicken
1 Tablespoon chopped olives

In skillet, saute the first four ingredients. Cook the rice in the chicken broth for 20 minutes till broth is absorbed. Stir rice into the sauteed vegetables, add the chicken and olives and heat through. Just a few minutes will heat everything. 

Sausage Gravy and Biscuits


Bettie likes a lot of pepper on hers
 Bettie and Lyle are both fond of Sausage gravy and biscuits. Bettie just recently bought me the Southern Living Feel Good Food cookbook. One of her requests was this recipe for sausage and gravy over biscuits.
 I must confess folks, I used Bisquick for the biscuits which were just fine. The gravy was, according to both of them “Great.”  I used a roll Sausage and it was so lean that I didn’t have any drippings to stir the flour into. I used butter for the full amount and did leave out the mushrooms, the recipe calls for as neither of them wanted them.
  If you like this type of breakfast this recipe is worth trying.
Sausage Gravy and Biscuits
 ½ lb. Mild ground pork sausage
¼ cup drippings or butter to make this amount
1 4 ounce package fresh shiitake mushrooms, stemmed and sliced
2 shallots (or ⅛ to ¼  cup onion) minced
¼ cup all purpose flour
½ cup chicken broth
¼ cup dry sherry or white wine (I used Sherry)
2 cups half and half
2 Tbsp. Chopped fresh parsley
1 tbsp chopped fresh sage
1 tsp. Worcestershire sauce
½ tsp salt
½ tsp ground pepper

Cook sausage in a large heavy skillet over medium-high heat, stirring for 3 to 5 minutes or until sausage crumbles and is no longer pink: drain, reserving ¼ cup drippings in skillet. (If necessary, add melted butter to equal ¼ cup.
 Sauté mushrooms if using, and shallots in hot drippings over medium-high heat 4 to 5 minutes or until golden. Whisk flour into mixture and cook, whisking constantly, 1 minute. Add chicken broth and sherry and cook 2 minutes, stirring to loosen particles from bottom of skillet. Stir in sausage.
 Gradually add half and half and cook over medium heat, stirring constantly, 2 to 3 minutes or until thickened and bubbly. 
Stir in parsley, sage, Worcestershire sauce and salt and pepper. Reduce heat to low, and cook, stirring occasionally, 5 minutes. Serve warm over baking powder biscuits.
*Use a dry Sherry not Creme or Sweet Sherry


Make it Yourself...Pasta Making Hints

Amish Noodle Day
We love homemade pasta. I have rolled these out by hand, like my mother-in-law - but I purchased the roller – cutter set for my Kitchenaid mixer, and they are great! Once I got a system down (where to hang the noodles, that I need a cutting board next to the mixer so I can flour my dough between rollings, etc. ) I actually enjoy making noodles for the freezer. So much so, I don’t buy noodles anymore. My husband likes to help if he’s home because it’s fun and he was raised on homemade noodles. They are much, much cheaper and better than purchased fresh or frozen noodles.  Fresh noodles cook quickly; if I freeze them, I don't thaw them before cooking.  They keep up to 6 weeks in the freezer - I never have them that long.
Watch a few U-Tube pasta making videos from Kitchenaid before you start. Then I’ll tell you what I didn’t learn from the videos. Leave yourself a couple of hours – they aren’t that much work, but there is some waiting time.
Farm eggs are not sized, so I have learned to put them in a measuring cup until I get the amount I want. Then I add flour accordingly. If I have ¾ cup, that’s good and I use about 11 ½ ounces flour. If I crack that last egg and have about 7/8 cup, I use 12 ounces of flour or so. Don’t leave out the salt – they taste yucky.
Your dough ball after you take it out of the mixer will be very stiff and hard, that’s OK, it will soften a lot as it rests. When you cut the dough into the first pieces, it shouldn’t have large holes in it – it’s not kneaded enough if it does – put it back and knead some more.
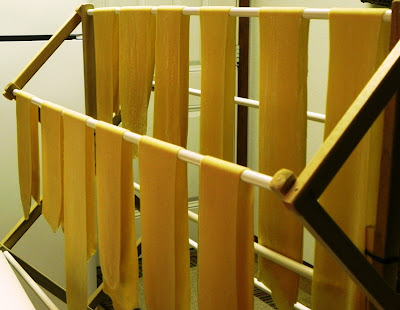
My Pasta drying before cutting on a clothes rack
I cut my dough into 5-6 pieces that are about 3 ounces each – in a recipe that’s about equal to 2 ounces of purchased dry noodles. I found that cutting the dough (I weigh it) before I let it rest, I can just start rolling after 20 minutes. This amount is right for the 2 of us, if I have company, I just cook more. This size of dough is a good size for getting into the pot without sticking together.
I purchased a $5 stainless flour shaker that is swell for flouring the dough between times through the rollers. If the dough is a little sticky, I lay it on my board, shake a little flour over it and it’s ready to roll.
After flattening the dough a little, I feed it through the rollers, flour one side, fold the unfloured side to the inside in thirds, then turn so the open end goes through the roller and roll again. I didn’t understand this fold and turn step at first, but having the folds on the sides as you feed them through helps keep your dough straight on the sides which helps when cutting it into noodles.
The first rolling and folding is also a kneading operation. Don’t skimp on it – you don’t want crumbly noodles – rolling helps align the gluten strands and makes better noodles.
You need to dry your pasta dough between rolling and cutting if you use a pasta machine of any kind.  I use either these drying racks or a clean clothes drying rack.
To get your noodles to run through the cutters successfully, you need to let them rest until the dough is almost dry to the touch, but not crackly. It takes a few times to get the feel of this, but the worst thing that happens is that you have to pull some of them apart by hand. If this happens, let the rest dry a little more. By the time you’ve made your first batch of noodles, you’ll have a pretty good feel for it.
Egg noodles actually freeze very well. Swirled into single-portion nests, you can freeze them separately and then bag them for long-term (at least a couple of months) freezing. When you want to cook your frozen pasta, it can go straight from the freezer into the boiling water, and you probably won’t notice a difference in cooking time.

Frozen pasta maintains its form, and its fresh flavor, better than the dried version
Next Wednesday, we'll give you our basic egg noodle recipe and methods.

Ham and Noodle Casserole


 I had this recipe and decided that supper tonight was the time to fix it. It is easy to get together and the only thing I saw in the recipe that needed to be clarified was not to over cook the noodles before putting the casserole in the oven. The 30 minutes it is in the oven will cook overcooked noodles to mush. Also, taste the sauce before you add all the horseradish. Horseradish is strong and your family might not want all of it. I used about ½ of the amount the recipe calls for and we felt that was enough for us. Every family varies though so taste as you go along.
Ham and Noodle Casserole
Yield: 4 to 6 servings
¼ cup butter
¼ cup all purpose flour
½ teaspoon salt
⅛ teaspoon pepper
2 ½ cups to 3 cups milk (I put in the larger amount)
3 to 4 teaspoons prepared horseradish (I used 2 teaspoons)
1 tablespoon prepared mustard
6 cups cooked wide egg noodles (about 10 to 12 ounces dry)
2 cups fully cooked ham
1 cup cubed cheddar cheese
½ cup soft bread crumbs toasted or cracker crumbs
 While noodles are cooking, in a large saucepan over medium heat, melt butter.
Stir in the flour, salt and pepper. Stir with whisk until smooth. Slowly add the milk. Bring to a boil. Cook and stir for 2 minutes or until thickened. Add the horseradish and mustard; mix well. Stir in the noodles, ham and cheese.
 Pour into a greased 2 ½ quart baking dish. Cover and bake at 350° for 20 minutes. Uncover and sprinkle with crumbs. Bake 10 to 15 minutes longer or until heated through.

Back at the Ranch Casserole

 If you’ve resolved to eat more beans and vegetables this year, here’s a casserole that the whole family will like that is ready in less than 30 minutes, and only uses one pan and doesn’t heat up the oven.
Kids and adults both like the wagon-wheel pasta shapes, but elbows or medium shells cook in the same time.  Serve it with a green vegetable and/or a green salad.  If you have hearty eaters, add a little corn bread too.                  
Back at the Ranch Casserole
  3           Ounces  Pasta -- wagon wheels, dry
     ½       Cup  Onion -- chopped
     ¼       Cup  Green Pepper -- chopped
  2          Teaspoons  Olive Oil
  1           Teaspoon  Chili Powder
  14        Ounces  Canned Tomatoes -- cut up (or 1 pint)
     ½       Teaspoon  Garlic -- minced
  8          Ounces  Canned Kidney Beans -- rinsed and drained
  4          Ounces  Frozen Corn -- thawed
     ¼       Cup  Shredded Cheddar Cheese -- 1 ounce
In a medium saucepan, cook and stir onion and green pepper in oil over medium-high heat until vegetables are tender, about 3 minutes.  Stir in the chili powder; cook and stir for 1 minute.
Stir in the undrained tomatoes, garlic and macaroni.  Bring to boiling; reduce heat.  Simmer,  covered, about 15 minutes or until desired consistency, stirring often.  During last 5 minutes, stir kidney beans and corn into tomato mixture, continue cooking 5 more minutes or until pasta is tender and sauce is thickened. 
To serve, sprinkle with shredded cheese.
Makes four 1-cup servings.
Cost:  $2.52 or 63¢ per serving

Per Serving: 232 Calories; 6g Fat (21.0% calories from fat); 10g Protein; 38g Carbohydrate; 7g Dietary Fiber; 7mg Cholesterol; 394mg Sodium.  Exchanges: 2 Grain (Starch); 1/2 Lean Meat; 1 Vegetable; 1 Fat.

Sunday in Iowa


This old Dutch-style house, built in 1849, is in Pella, Iowa

Family Favorites...Orange Meringue Pie

For a different pie, this recipe from the Cookbook Good Food on a Budget makes a good dessert. While I think I prefer Lemon, Sue, Bettie and Lyle really like this.
  It is not what I would call inexpensive unless you make it when oranges are in season, not like I do in the middle of winter, but it is such a sunny pie to make when it’s cold outside. It takes 6 medium oranges (usually) if you use navel oranges. Sometimes our store has Valencia oranges which are a juice orange and then it will take less.
  I do use the meringue recipe from yesterday's post instead of the meringue recipe listed here.  Notice that this is for a 8 inch pie not a 9 inch pie crust.
Orange Meringue Pie
¾ cup sugar
¼ cup cornstarch
¼ teaspoon salt
1 ½ cups orange juice
2 slightly beaten egg yolks
1 tablespoon butter
1 teaspoon grated orange peel (optional)
1 baked 8 inch pie shell
2 egg whites
¼ cup sugar
In saucepan combine ¾ cup sugar, cornstarch, and slat. Slowly stir in juice. Cook and stir till thickened and bubbly. Reduce heat,. Cook 1 minute more; remove from heat. Stir small amount of hot mixture into yolks; return to hot mixture. Cook and stir 2 minutes more. Stir in margarine and peel. Pour in to pie shell.
  Beat egg whites to soft peaks. Slowly beat in ¼ cup sugar to stiff peaks; spread over hot filling, sealing edges. Bake at 400° for 7 to 9 minutes. Cool on rack.

Meringue for Pie


 I have been making pies for better than 65 years and just now found a great recipe for Meringue. It was on the Cooking Club web site.
Isn't this a pretty piece of Pie
 Meringue pie topping, should be tall, golden brown and stay that way! (and I have made lots, different recipes, etc, trying for a topping that would stay soft and not fall when refrigerated or  become rubbery)  This did! Who knew that putting a cornstarch slurry in with the egg whites would make this happen. From now on, this is the recipe I will use. It is not a bit hard to make, the recipe did call for some lemon juice in the meringue as it was on a lemon pie. I chose to omit this as I wanted to see how it would work without for use on pies that are not citrus. I am sure it would enhance the flavor of a citrus pie, but it was fine without it. Next time I am going to add about a ½ teaspoon of vanilla. The cornstarch and water is added warm to the foamy egg whites. The cornstarch and water thickened quite a lot and I was worried about adding it, but it beat in just fine. I am guessing you would not want it too hot, just warm. Do be sure your pie filling is hot. Meringue needs to cook from the bottom also. A slow oven lets it cook as well as brown. Torches work to brown but they do not cook the meringue and so that type need to be eaten right away.
 If you are a fan of Meringue topped pies I hope you will try this.
MERINGUE
1/3 cup water
1 tablespoon cornstarch
4 egg whites
Dash salt
1/2 cup sugar
  To make meringue, in small saucepan, combine 1/3 cup water and 1 tablespoon cornstarch; mix well. Bring to a boil over medium heat. Boil 30 seconds, stirring constantly, cover to keep warm.
 In large bowl, combine egg whites, and dash salt; beat at medium-low speed until egg whites are frothy. Increase speed to medium; beat until egg whites hold a soft peak. With mixer running, slowly add 1/2 cup sugar; spoon in warm cornstarch mixture. Increase speed to medium-high; beat until mixture is glossy and egg whites hold a stiff peak. 
 Spoon half of meringue evenly over hot filling, making sure meringue covers all filling and touches crust on all edges. Spoon remaining meringue onto pie and spread evenly. Add decorative swirls with back of spoon.
 Bake 15 to 18 minutes at 350°F or until meringue is dry to the touch and light brown. 

*This was just excellent the next day after being in the refrigerator overnight. I saved a piece to try it as that will usually toughen a meringue on a pie. Great recipe!

Make it Yourself... Chiffon and Parfait Pies

Two different types of Parfait and Chiffon Pies. One with ice cream and one with egg whites. Both are excellent and a change from fruit and custard pies. They were popular when Sue and I were young housewives. I made them often for entertaining.
Pineapple Parfait Pie
 Parfait Pies -The Better Homes and Gardens Golden Treasury cookbook has this to say about Parfait pies. "A trendsetter of the 50’s they originated in the US as a promotion by a flour miller and a manufacturer of fruit flavored gelatins". Single crust concoctions with fruit, gelatin, and ice cream filling, these pies were very popular because they were so easy to make and there were so many combinations of fruit, ice cream and gelatins to try”.
The term Parfait means perfect. So fitting for this type of pie.
  Use a good ice cream when making this. It is the main ingredient so you want it to be a good quality. The cheaper ice creams have a lot of air whipped into them, and will not work as well. How about trying raspberries, vanilla ice cream and raspberry jello or Orange jello, orange juice for the liquid, vanilla ice cream and adding some flaked coconut. Use your own favorite flavors just use the same quantities.
 Pineapple Parfait Pie
1 8 -¼ can crushed pineapple
1 3 ounce package lemon flavored gelatin
1 pint vanilla ice cream
1 baked 8 inch pie shell
Whipped cream
  Drain pineapple; reserve syrup. Add water to syrup to make 1 ¼ cups. Combine gelatin and syrup; bring to boiling. Stir till gelatin is dissolved. Remove from heat. Add ice cream by spoonfuls to hot liquid; stir till melted. Chill till partially set; fold in pineapple. Pile filling into pastry shell. Chill till firm. Garnish with whipped cream and cherry if desired.

 Chiffon Type Pies were quite popular in the 40’s. This recipe from the Better Homes and Gardens Golden Treasury of Cooking is that type of pie. I made these often when I was first married and we entertained a lot. Now days, I still make them, but just not as often.
  They call for egg whites beaten stiff and folded in.
Citrus Pie
½ cup sugar
Citrus Pie
1 teaspoon (1 envelope) unflavored gelatin
Dash salt
4 egg yolks
½ teaspoon grated lemon peel, set aside
⅓ cup lemon juice (I used Meyer Lemons)
½ teaspoon grated orange peel, set aside
3 Tablespoons orange juice
2 Tablespoons water
4 egg whites
¼ cup sugar
1 baked and cooled 8 to 9 inch pie crust
In saucepan combine the ½ cup sugar, gelatin, and salt. Beat egg yolks, lemon and orange juice and water together. Stir into gelatin mixture. Cook and stir over medium heat just until mixture comes to a boil. Remove from heat and add saved grated peel.
Cool, stirring occasionally until partially set. 
 Beat egg whites until soft peaks form, slowly add the ¼ cup sugar and continue beating until stiff peaks form. Fold in gelatin mixture. It helps to lighten the egg whites with a small amount of the gelatin mixture before folding all of it in.
  Put into pie shell and chill till firm. Trim with shredded orange peel if desired.
  

Barley and Vegetable Pilaf


This dish has everything good for you – crisp vegetables and whole grains – and it’s simply delicious.  If you don’t have pea pods, add some small whole green beans about 5-7 minutes before the dish is done.  I used fresh sugar snap peas.  The sherry and white Worcestershire (now sold as marinade for chicken) give it an outstanding flavor.   Be sure you buy a bottle of inexpensive dry sherry from the wine department, not salty, briny “Cooking Sherry”.   The mushrooms add that meaty flavor.
This serves 4 for a vegetarian main dish or 6 for a side dish.            
Barley and Vegetable Pilaf
  2         Cups  Fresh Mushrooms -- sliced
     ¼     Cup  Onion -- chopped
  1         Medium  Carrot – shredded or julienned
     ½     Teaspoon  Garlic -- minced
  1         Tablespoon  Butter
  2         Tablespoons  Sherry
  1         Tablespoon  White Worcestershire Sauce
  2         Cups  Chicken or Vegetable Broth
  1 ½     Cups  Barley -- quick cooking (7 ounces)
  1         Teaspoon  Italian Seasoning
     ¼     Teaspoon  Black Pepper
  4         Ounces  Fresh Pea Pods -- or 6 ounces frozen
     ½     Cup  Pecan Halves
In a 10" skillet, cook the mushrooms, onion, carrot and garlic in hot butter over medium heat until mushrooms are tender.  Add sherry and cook until evaporated.  Stir in broth, barley, White Worcestershire sauce and seasoning.  Bring to boiling; reduce heat.  Cover and simmer for 15-18 minutes or until barley is tender and liquid is absorbed.
(If using frozen pea pods, place frozen pea pods in a colander.  Run cold over the pea pods for 1-2 minutes or until thawed.  Drain.)
Stir pea pods into barley mixture.  Cover and let stand for 3 minutes or until heated through.  Top with pecans.

4 Servings

Breaded Dijon Pork Chops

I’m always looking for recipes to use good Iowa pork, and this one is a winner.  Our chops were tangy and juicy, not dry!  I used good Dijon mustard, and was glad to use up some slightly stale saltines.  Don’t overcook your chops, the times are just right.                       
Breaded Dijon Pork Chops
     3/4      Cup  Crushed Saltines -- 20 crackers
     1/2      Teaspoon  Dried Thyme
     1/4      Teaspoon  Pepper
     1/4      Teaspoon  Dried Sage
  3             Tablespoons  Dijon Mustard
  4             Pork Chops -- about 6 ounces each
  1             Tablespoon  Olive Oil
  1             Tablespoon  Butter
In a small bowl, combine crumbs, thyme, pepper and sage.  Spread mustard on both sides of pork chops; coat with crumbs.
In a large skillet, cook chops in fat over medium-high heat for 4-5 minutes on each side until golden brown.
  Per Serving: 376 Calories; 31g Fat (75.5% calories from fat); 22g Protein; 1g Carbohydrate; trace Dietary Fiber; 93mg Cholesterol; 230mg Sodium.  Exchanges: 0 Grain(Starch); 3 Lean Meat; 4 Fat; 0 Other Carbohydrates.
4 Servings

The Taste of Home Cook Book

Family Favorites...Sour Cream Apple Squares

  I would give this recipe a 5 Star rating!  It’s easy, looks great, and is delicious.  From an Indiana cookbook published in "Best of the Best of the Midwest" I thought, just reading the recipe, that it was worth a try…it exceeded my expectations.  It has a crisp, thin bottom crust, topped by a very moist apple cake.  Anything that only uses one large bowl and a spoon to mix is my kind of recipe.  It was good from the oven, just cooled to lukewarm; and it froze well too.  I got twice as many bars as the recipe called for; they are rich enough for smaller, easier-to-eat bars.  I used Granny Smith apples, and drizzled on a little powdered sugar glaze.
Sour Cream Apple Squares
  2          Cups  Flour, All-purpose (9 ounces)
  2          Cups  Brown Sugar -- firmly packed  (14 ounces)
     ½      Cup  Butter -- softened
  1          Cup  Walnuts -- chopped
  2          Teaspoons  Cinnamon
  1          Teaspoon  Baking Soda
     ½      Teaspoon  Salt
  1          Cup  Sour Cream
  1          Teaspoon  Vanilla Extract
  1          Large  Egg
  2          Cups  Apples -- peeled and finely chopped (2 medium)

Preheat oven to 350°.  In large bowl, combine flour, brown sugar and butter until crumbly.  Stir in nuts.  Press 2 3/4 cups (about 15 ounces) of crumb mixture into ungreased 9 x 13" pan.
To remaining mixture, add cinnamon, baking soda, salt, sour cream, vanilla, and egg.  Blend well.  Stir in apples.  Spoon evenly and carefully over base.
Bake at 350° for 25-35 minutes until toothpick comes out clean.  Cut into 12-15 squares - I got 30.     "One 9 X 13" Pan"
2014 Cost:  $4.13 or 21¢ per bar (using 30 bars)
Per Serving: 215 Calories; 11g Fat (44.8% calories from fat); 4g Protein; 27g Carbohydrate; 1g Dietary Fiber; 28mg Cholesterol; 179mg Sodium.  Exchanges: 1/2 Grain (Starch); 0 Lean Meat; 0 Fruit; 0 Non-Fat Milk; 2 Fat; 1 Other Carbohydrates.

Citrus Chicken


 We have been trying again to eat more chicken. Not only is it good for us, it is also less expensive. Tonight Citrus Chicken from Better Homes and Gardens chicken cookbook was on the menu.
 It turned out well, was quick to fix and everyone seemed to like it. They had suggested serving it with Linguine, but Lyle and Bettie thought noodles would be better. I cooked the noodles while I was getting the chicken done and added butter and Italian herbs to them. Served with the chicken with the orange and mushroom sauce it made a filling and quick to fix dinner.
Citrus Chicken
4 medium skinless, boneless chicken breast halves (about 12 to 16 ounces)
2 teaspoons shredded orange peel
1 cup orange juice
¼ cup balsamic or white wine vinegar (I used white wine)
1 tablespoon cornstarch
2 teaspoons honey
1 teaspoon instant chicken bouillon granules*
Dash pepper
2 cups sliced fresh mushrooms
2 tablespoons butter
Linguine or noodles or rice
DIRECTIONS
Rinse and pat dry chicken. Place each breast half between 2 pieces of plastic wrap. Pound lightly with the flat side of meat mallet to a ⅛ inch thickness.

In a small bowl; stir together the orange peel, orange juice, vinegar, cornstarch, honey, bouillon granules and pepper. Set aside.
  In a large skillet cook mushrooms in hot butter till tender; remove from skillet. In the same skillet cook chicken over medium heat about 4 minutes or till no longer pink; turning once. Remove chicken from skillet; keep warm. Return mushrooms to skillet. Stir orange juice mixture and add to mushrooms. Cook and stir till thickened and bubbly. Cook and stir for 2 minutes more. Serve chicken and sauce over pasta of your choice or rice. Sprinkle with chives and garnish with orange slices if desired.
*I used about ⅛ cup of chicken broth instead of the bouillon. Using the broth as part of the 1 cup of orange juice.

Make it Yourself...Crumb Crusts

Graham Cracker Crust 

  Another type of pie crust is the crumb crust. Most typical of these are the graham cracker crusts. While you can buy crumb crusts already made, they are so easy to do and really taste better than the prefab ones from the store. 
Graham Cracker Crust
Combine 1 ½ cups (about 18 crackers) or buy the box of graham cracker crumbs, If using crackers blend in your blender or food processor till crumbs are fine, ¼ cup sugar, and ½ cup melted butter. Mix well. Press firmly into unbuttered 9 inch pie plate. Bake in 375° oven for about 8 minutes or until edge is lightly browned. If you prefer an unbaked crust, chill crust till set about 45 minutes and then add filling.

Vanilla wafer Crust 
Use 1 ¼ cups fine vanilla or chocolate wafer crumbs, with ⅓ cup melted butter. Press
Firmly against bottom and sides of buttered 9 inch pie plate. Chill in refrigerator until set.

Gingersnap Crust 
Mix 1 ½ cups fine gingersnap crumbs and ¼ cup soft butter until well mixed. Press into bottom and sides of butter 9 inch pie plate. Bake in moderate oven 375° for about 8 minutes. Cool.

Chicken and Mushroom Marsala

Sue gave me a bottle of Marsala when she cleaned her cupboards this week, so we had Chicken Marsala for supper tonight. You really can’t go too far wrong with butter, mushrooms, a few onions, chicken, Marsala and homemade chicken broth. 
 We ate all of it so none for lunch tomorrow. I used skin on chicken hindquarters as we like them better and they braise better than skinless, boneless chicken breasts. They are also quite a bit cheaper to buy. Mushrooms were on sale today and with the homemade chicken broth it was a inexpensive dish to serve. We had it with rice to which I had added vegetables and cooked in chicken broth. You could use sherry to make this dish also, but the Marsala does taste just a little different. Would make a good dish for a company dinner, maybe with some asparagus in the spring and new potatoes to spoon the pan juices on.
Chicken and Mushroom Marsala
Serves 6
Chicken breasts with skin (about 2 1/2 pounds), halved or use chicken hindquarters, thighs and drumsticks (we like the dark meat)
1 1/2 tablespoons vegetable oil
3 1/2 tablespoons butter
1 onion, halved and sliced thin (I use just a few slices)
3/4 pound mushrooms, sliced thin, any variety you like
1/2 cup Marsala
¾ to 1 cup chicken broth
2 tablespoons minced fresh parsley leaves (optional, for garnish)
Pat chicken dry and season with salt and pepper. In a large heavy skillet heat oil and 1 1/2 tablespoons butter over moderately high heat until hot but not smoking and brown chicken in 2 batches, transferring with tongs to a large plate as browned.
Discard all but 1 tablespoon fat from skillet and sauté onion and mushrooms, stirring occasionally, until liquid mushrooms give off is evaporated. Add Marsala and cook mixture, stirring, until Marsala is almost evaporated. Add broth and chicken with any juices that have accumulated on plate and simmer, turning chicken once, until cooked through, about 15 minutes**. Transfer chicken with tongs to a platter.
Simmer mushroom sauce until liquid is reduced to about 1/2 cup. Remove skillet from heat and stir in remaining 2 tablespoons butter and salt and pepper to taste, stirring until butter is just incorporated. Spoon mushroom sauce around chicken and sprinkle with parsley.
**I cooked the chicken on medium low about 25 minutes.

Ring Bologna and Sauerkraut

Myrna and I grew up in a community where really good ring bologna was available from the local meat markets, each from their own recipe.  Now we are lucky enough to live near Pella, Iowa, where there are two meat markets that each make and market their own recipe for ring bologna and both are good.  You can buy Pella or Ulrich’s bologna at all the supermarkets around here.  I know that many Midwestern states have their own local favorites.
Here’s the way we like it at our house.  I use Frank’s brand canned sauerkraut – it tastes the most like our grandma’s homemade – and no, they didn’t pay me to say that.   This is a good, simple recipe that my husband likes with boiled potatoes or noodles, either one in brown butter.  The noodles in the photo are homemade.                  

Ring Bologna and Sauerkraut
  1          each  Ring Bologna -- (1 lb. or more cut into 4 pieces)
  32        fluid ounces  Sauerkraut
     ½      cup  Onion -- chopped
  2          tablespoons  Butter
     ½      teaspoon  Celery Seeds
     ½      teaspoon  Caraway Seeds
     ½      teaspoon  Salt
     ½      teaspoon  Pepper
In a large skillet, sauté onions, celery seed, caraway seed, salt and pepper. Add sauerkraut.   Add ring bologna on top. (Bologna could be pierced or slashed instead of cut into pieces.)
Cook, covered, 20 -30 minutes. 

4 Servings