Showing posts with label canning meat and poultry. Show all posts

$avings $aturdays...Canning Sale Chicken

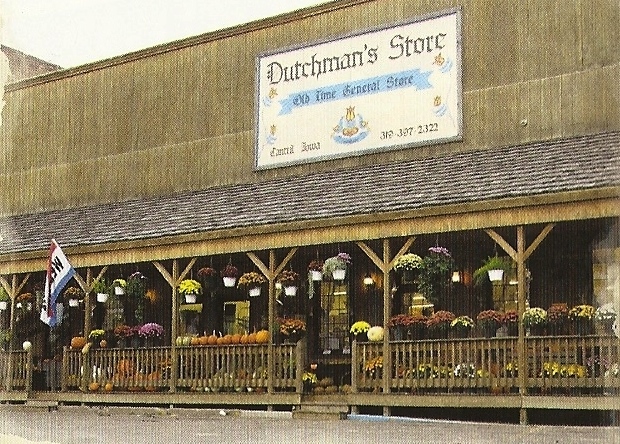
The Dutchman's Store in Cantril, Iowa

After reading about Avian flu being discovered in several backyard flocks of chickens and ducks in several states we thought we might want to replenish our chicken supplies in the pantry and freezer.  Monday we made a trip to Cantril to the Dutchman’s...a Mennonite store that often has very good deals on frozen meat and poultry as well as bulk baking supplies, spices, canning supplies and the like.  We had not made the 70 mile trip since October of last year.  Everything else was 10% to 20% higher than our last trip in the fall, same as our local groceries, except for my poultry purchase.  Bulk canning lids were in stock, but the sign said "Imported", not the Ball commercial canning lids they usually carry...I have about 500 lids on hand at home.

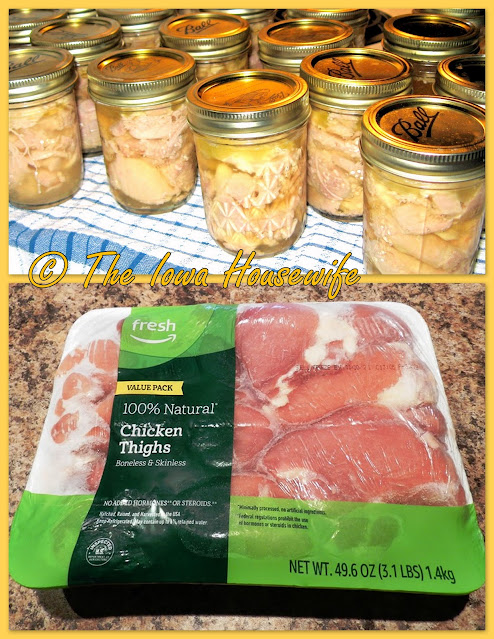
I bought what bulk groceries I needed to replenish our pantry, and lucky me, I found 3 pound packages of nice boneless, skinless chicken thighs which are what I like to can for $3.99, or $1.33 per pound!  Since I paid $2.79 a pound for the last chicken thighs I purchased for canning, this was a great deal! The local HyVee grocery chain had them on sale for 99¢ a pound a week or so ago, but the store here never got any.  

I brought the chicken thighs home and thawed them and canned 6 pounds of them on Tuesday.  The other package went in the freezer.  I got 19 half pint jars with 4 ½ ounces of cooked meat in each jar and all of them sealed too.  If you want to cook them for the freezer instead of canning, check here.

On Thursday, the USDA announced it had found Avian flu in a flock of chickens in Iowa…also a home flock with about 40 birds that had to be destroyed and the location was quarantined.  From experience, we know that this problem will eventually spread to commercial flocks and prices for poultry and eggs will skyrocket. 

I now have 5 dozen jars of canned chicken from 2021 and this week in my pantry…up from my usual stock of 3 dozen.  This will provide us with plenty of cooked chicken for soups, casseroles, chicken salad, and the like .   

I use a 16 quart Presto pressure canner.  It holds 13 half pint jars so I did two loads in succession, to reduce cleanup.


                Home Canned Chicken Thighs - 1 canner load
  3 1/3         pounds  chicken thigh, no skin, R-T-C -- 4.125# yields 12 jars
  3 1/3           cups  water
  2 1/2    tablespoons  chicken base
                                                
                        OR   (4.125# yields 12 jars)
  4           5 pounds  chicken thigh, no skin, R-T-C
  4             5 cups  water
  3        tablespoons  chicken base
  1         tablespoon  chicken marinade -- if desired
 
Night before:  Assemble canners, jars, rings, lids, tools; line baking pans w/foil, get out plastic gloves, have chicken thawed.
Bring meat to room temperature, about 30 minutes.
Preheat oven to 425°.  Put racks on the slots above and below the center slot in the oven.  
 Cut thighs in half so they lay flat, cut in 1-2" pieces.  Place chicken on extra wide aluminum foil lined half sheets.  Sprinkle with salt. (USE PLASTIC GLOVES).  Clean work area with clorox wipes or hot soapy water.  Don't let raw chicken contaminate the area or come in contact with cooked chicken.
Place sheets in the oven.  Set one timer for 5 minutes and another for 10 minutes.
After 5 minutes reverse pan locations and continue baking until meat looks just set, about another 5-7 minutes.
Total time about 10-15 minutes, depending on how cold the chicken was at the beginning.
Meanwhile, heat the remaining ingredients in the microwave.  Prepare jar lids according to package directions.
Place empty half pint jars in pressure canner with 3 quarts of water.  Let it come to a low boil, with canner lid on but not tightened.  (This is to eliminate thermal shock so your jars don’t break.
Prepare trays to fill jars.  Get out rings, lids, jar lifter, lid magnet, plastic knife, ladle, dinner tablespoon.
Remove pans from oven; place at sink and fill each hot jar with 4 1 /4  ounces of meat, weighing jars.  Fill jars with broth to within one inch. Remove bubbles with a plastic knife.  Adjust lids and place in canner.
Put lid on canner; let vent 10 minutes, cover and time for 1 hour and 15 minutes after rocker starts to move.  Turn down gradually to medium low and let process, with rocker just moving slowly.
Remove from heat and let cool on rack until pressure comes down of its own accord, about 25 minutes.
Remove jars to towel-lined trays; let seal.  After several hours, remove rings and wash jars in soapy water and store in pantry.
You get one half pint with 4+ ounces from every 5 1/4 - 5 1/2 ounces of raw meat.
Yield:   "9 or 10 half pints"

Winter Canning 2022

Clockwise, Top left:  Chili, Ham and Bean Soup, Spit Pea Soup, Corn Relish

I’m starting my winter canning today, actually, by canning some more chili for the pantry.  I bought some ground beef for $2.97 a pound, what I actually paid in 2020 too, and I have all the other ingredients in my pantry.  I also have frozen corn I want to use, so I’m going to can Corn Relish. 

Looking at my freezer and my pantry inventory, I am also probably going to make Split Pea Soup and Ham and Bean Soup because I have some ham shanks I want to use and I have less than a case of each soup on hand and soup season isn’t over yet.

This gives me a chance to use some jars that would have stayed empty until late summer canning, and I’m replenishing my pantry.

I also usually can chicken and hamburger during this season, but I have enough on hand already canned to last this year, 45 half pints of chicken and 24 half pints of hamburger mix.

Saturday Thoughts...Michelle is filling her new pantry!

Since she got her new pantry shelves last month, my daughter-in-law Michelle has been busy filling them up.  She has been canning meat..Beef, Pork and Chicken to help keep them going.  She got the pork on sale for 99¢ a pound last week! And she bought the beef and chicken on sale too.
Left: Canned Chicken Breasts, R. top: Canned Pork Loin,
 R. Bottom: Canned Beef  
She says “I can’t remember the type of beef roast (hot pack) it was but I was able to get 5 pints. The 3 whole pork loins I cold packed and got 28 pints total. The chicken was hot packed, boneless chicken breast, I got 8 pints.”
She added a lot to that meat shelf in her new pantry!  The shelf with the boxes and empty jars on it now is filled with pints of canned meat and poultry!
One of the biggest problems is trying to buy canning lids…she had plenty of jars.  They hit the nearest Amish store, the farm store, the grocery and discount stores…nothing, and this is in farm country were many people can from their gardens and farms all the time.
Our son called us…I had a dozen boxes of Ball lids of 12 per box that I could spare so we made a quick trip and met in the town half way between our places to pass on the lids.  Luckily, I had purchased some bulk lids (packed 345 to a tube) before the pandemic started, and hadn’t started on them yet, and still had some more Ball lids too so I could afford to share some.  Right now, I can't get those bulk lids anywhere either.
We’re happy to see them getting their food storage in place; and they see a new urgency as our son had his hours cut down this week too.   His work had been unaffected up until now.  But they are both good managers and hard workers so we know they will get through this downturn.  Living in the country where they have a garden and chickens helps too.

Saturday Thoughts...Smoked Ham Shanks


I’m did some Spring canning to stock up my pantry this week as the temps were in the 30's and 40's and we had 4 inches of snow Wednesday and another 3+ inches Friday morning here in Southern Iowa, where some folks got up to a foot.  At least snow here in April melts quickly.
We canned bean soup and split pea soup again, as well as chicken and chicken stock.  This week ham shanks were on sale for $1.99 a pound, and they are what I use for canning bean and split pea soup…they are smoked and delicious!  These were brown sugar and honey cured.
Clockwise; bottom left :  Cooked ham shank, Package labels, two uncooked shanks.  
It occurred to me that not everyone has used or even seen ham shanks, so I took some pictures while I was waiting for my split peas to cook before canning them. 
The shank refers to a fairly meaty part just below the pork shoulder, and the hock refers to a much bonier cut taken from just above the feet.  As you can see, they don’t have as much skin and fat on them as ham hocks do.
I used to use ham hocks until I discovered ham shanks…I am a total convert!  They range in weight between 1 1/4 pound and 2 1/2 pounds.  This one, at about 1.795 pounds gave me 12 ounces of meat, just enough for 9 pints of soup. 
More meat, less waste, and a delicious smoky flavor!  I keep extras in the freezer if I buy them on sale.

Here are my favorite canning recipes using ham shanks: 


Slow Cooker Beef Stock

Clockwise from top left:  canned stock in 12 oz. jars, starting to fill slow cooker,
Roasted vegetables and bones, ready for roasting
 My brother-in-law, Don, gave us some really meaty soup bones from their last processed homestead-raised beef.  To make it easier for me, I roasted the bones and vegetables like I usually do, then placed them in the slow-cooker to cook unattended instead of a stock pot on the stove.
I canned my stock the next day; if you want more detailed directions for canning, check here.  It's perfectly good to simply freeze the stock in the size portion you usually use.   
I removed the meat from the bones after 5 hours, so we could still use it for soup making.  8 hours makes it just too done. 
I also save the beef fat and use it for cooking, just like Grandma did.  It’s wonderful for making beef gravy, instead of using other fats; as it has all that good beef flavor.  You can freeze it in portions the right size for the gravy recipe you usually make.               

Slow Cooker Beef Stock
  2        Tablespoons  Tomato Paste
  5        Pounds  Meaty Beef Marrow Bones
  2        Stalks  Celery -- 2" pieces
  1        Large  Carrot -- 2" pieces
  1        Large  Onion -- peeled, 8 wedges
  2        Each  Bay Leaves
  1        Tablespoon  Peppercorns
  6        Cups  Water
  1. Preheat oven to 500°.
  2. Brush tomato paste evenly over bones, place in a large roasting pan.  Add celery, carrot and onion; bake for 30 minutes at 500°.
  3. Place bones and vegetables in a 6 quart slow cooker; add seasoning and water.
  4. Cook on low for 8 hours.  Optional: remove meat from bones after 5 hours and save for another use.  Return bones to cooker and continue cooking for the total 8 hours.
  5. Strain stock; discard solids.  Cover and chill overnight. (I don't strain mine through a cheese cloth, I don't mind having some of the tiny bits of meat and vegetables in my stock.  My strainer is fairly fine, however.)
  6. Remove solid fat from the surface; place in a covered jar and save to use for cooking and gravy making.
  7. Freeze stock or can it.
  8. To can; reheat stock.  Pour into hot jars, leaving 1" headspace, adjust lids and process in a pressure canner for 20 minutes at 10 pounds pressure.

Yield:  "9 Half Pints"

Canning or Freezing Ground Beef...Home Canned or Frozen Hamburger Mix

This is a recipe that I have canned for years.  It is a combination of a couple of recipes from the "Farm Journal Thrifty Cook Book" from 1974 and the “Farm Journal Freezing and Canning Cook Book” from 1964.   I like to can it to have it ready on the shelf, to use with no thawing, whenever we want a quick meal.  I also like making the cooking mess one time for a number of meals.  
It can also be frozen in freezer bags or containers.  I can it in half pints for the two of us; double the recipe to can 7-8 pint jars.  A pint jar is 2 cups of meat mixture, a half-pint is about 1 cup.
It can be easily doubled, and I have used either tomato paste and water, or tomato sauce and water, or even plain tomato juice for the canning liquid.  We like the celery in this mixture, if you leave it out, double the onion, or have a smaller yield or follow Ilene Jones suggestion and substitute green peppers, diced.
The chili sauce is my personal addition, it is certainly optional.  Actually, I add whatever other seasoning I want when I use the mix; the taste is fresher, and the mix is more versatile.  I can use it in either Italian or Mexican-flavored dishes that way. 
The rest of the week and next week, I'll share some of the recipes for using this mix.                

                Hamburger Mix - 2# beef
  1             cup  Celery -- finely chopped  
  1             cup  Onion -- finely chopped
  2             pounds  Ground Beef
  2             teaspoons  Salt
     1/4      teaspoon  Pepper
     1/4      Cup  Chili Sauce (optional)
  12           Ounces  Tomato Paste -- more or less
  1 1/3      Cups  Water or broth from mixture
 Or Substitute for Tomato Paste and Water the Tomato Sauce and Water Below
  15            Ounces  Tomato Sauce
    1            Cup  Water or Broth From Mixture
Cook beef in large kettle until red color disappears, don't break up too much.  Drain broth and skim fat if necessary, measure and add water to yield enough liquid.  Add other ingredients to beef and bring to a boil.
Prepare lids according to manufacturer's directions.
Divide mixture among 7 hot half pint jars with 1" headspace. Remove bubbles with plastic knife and wipe jar rim carefully with hot wipe before sealing.  Cover and seal, place in pressure canner (with 2-3 quarts simmering water, check your canner book for amount for your canner), exhaust steam 10 minutes, process in pints or half pints 1 hour and 15 minutes at 10# at 1000’ or less altitude.
Let pressure drop of own accord (30 minutes), open canner, remove jars to clean towel and let cool and seal, setting apart to allow air to circulate.  Remove rings and wash jars carefully.  Store in a cool, dark place.
Can also be canned in pint jars for 75 minutes or in quart jars for 90 minutes, or frozen.  Above 1000' use 15# pressure.  
A half pint of mix contains ¼ pound of ground beef, or a ½ pound in a pint.
Yield:  "7 Half Pint Jars or 3 pints and a half pint”


Use in recipes, or heat the mix and spoon between split buns.  Also can be spread over horizontally sliced French bread, topped with Italian seasoning and  mozzarella cheese and baked 20 minutes for French Bread Pizza.  
Use it in any recipe you would brown ground beef and a little onion for, and simply continue with the recipe, substituting a half pint for 1/4# ground beef or a pint for a 1/2# of beef.  Use several jars if you need a larger amount.


Cheeseburger Cup Muffins


Iowa Spanish Rice


Beef and Bean Burritos


Chili Mac


Chili and Beans


Hamburger Pie


Taco Pasta Salad


One Pan Spaghetti


Easy Pantry Chili


Cheeseburger Soup


Skillet Macaroni Lasagna

Home Canned Chicken Breasts

Today I wanted to get a 3# bag of frozen boneless, skinless chicken breasts out of the freezer and into cooked portions ready to use anytime.  I canned them because I’m too impatient to wait for frozen chicken or broth to thaw, even if it’s cooked, before I start a meal.  I make these regularly, and always get just about the same yield.  You need to thaw your chicken a day or two in your refrigerator before canning.  I place the bag in a pan to prevent a mess in my refrigerator if the bag isn't completely watertight.
If you see them on sale, as I did, or you want them in a convenient form to use, this is easy canning, no skinning or boning necessary.  I can any leftover broth alone at 10# pressure for 20 minutes at 1000’ altitude for half pints or pints, or freeze it if it isn't enough to can. 
The day after I canned these last time, I saw pint jars of canned chicken for sale for $6.99 a pint jar at the Dutchman’s in Cantril, Iowa, compared to this entire recipe, which yields 7 half pints or 3 ½ pints and usually costs me less than $6.99 including the chicken and vegetables.  See my cost comparison at the bottom of the recipe.
Think chicken casseroles, soups, creamed chicken on biscuits, noodles or rice, homemade noodles and chicken, chicken salad, and all the variations.  A half pint jar, which I use in this recipe, is about a cup of cooked meat, perfect for many recipes. 
                       Home Canned Chicken Breasts
Yields 7 half pint jars, about 4 ounces cooked meat each.
Thaw your chicken breasts in the refrigerator a day or 2 ahead of canning.
  3             Pounds  Chicken Breasts -- skinless, Boneless
  1             Large  Onion
  1             Stalk  Celery
  1             Large  Carrot
     1/4      Teaspoon  Black Pepper
                 Salt -- to taste
  1             Bay leaf, if desired
  4             Cups  Broth -- and water to make this amount
·        Prepare Chicken:  Cut the thawed chicken breasts in half lengthwise.  Place the chicken breasts in a 4 1/2 quart Dutch oven or soup pot.  Peel the onion, cut it into 4 pieces, and add them to the pot.  Cut the celery into 4 pieces and add them to the pot.  Add just enough cold water to completely cover the chicken and vegetables, then sprinkle with salt and add the bay leaf if using.
·        Cover the pot and bring to a rolling boil over high heat, as soon as the water reaches a vigorous boil, remove the pot from the heat and let it stand, covered, until the chicken is no longer pink in the center, about 20 minutes for average-size pieces.  Do not overcook.
·        When chicken is done, remove it from the pot, using tongs or a slotted spoon.  Allow the chicken to cool enough to cut into bite-size chunks.  Strain broth for canning liquid, discarding the vegetables and bay leaf.  
While you are waiting for the 20 minutes, you can prepare your equipment.
·        Prepare Canning Equipment: Heat jars in simmering water for 10 minutes, keep in simmering water until ready for filling.  (I do this right in my canner).  Wash an extra 12 ounce jar to pack in in case you have a little more than will go into a half pint.  Prepare lids and rings according to manufacturer's directions.
·        Pack Chicken:  Fill jars with meat, about 4 ounces each.  Cover with hot broth, about 1/3 cup per jar, leaving 1" headspace.  Remove bubbles with plastic knife and wipe jar rim carefully with hot wipe before sealing.  Cover and seal, place in pressure canner (with 2-3 quarts  simmering water, check your canner book for amount for your canner), exhaust steam 10 minutes, process in pints or half pints 1 hour and 15 minutes at 10# at 1000’ altitude.
·        Let pressure drop of own accord (about 30 minutes), open canner, remove jars to clean towel and let cool and seal, setting apart to allow air to circulate.  Remove rings and wash jars carefully after they are completely cooled.
Equipment:  Stock pot or Dutch oven, chopping board, pressure canner, 13 x 9" pan or tray lined with paper towel for jar filling, jars, lids and rings, funnel, lid magnet, jar lifter, plastic knife.
Excellent in sandwiches, creamed or in soups and casseroles.

Cost:  If 3# chicken is $3.99, cost is $5.23 or 75¢ per half pint or 4 oz. meat.  If chicken is $4.99 per 3#, cost is 89¢ per half pint or $6.23 per batch, using purchased vegetables.  I also get about 4-5 half pints of broth.

Home Canned Chicken a La King


Myrna used to can this recipe from the Better Homes and Gardens 1973 Home Canning Cook Book years ago, and used the flour in the mixture called for in the recipe.  Since the USDA doesn't recommend flour in this type of recipe anymore, I canned mine just in broth.  This way I can use it for either a broth soup base or for Chicken a La King by thickening it when I heat it to serve.
I poached some skinless, boneless chicken breasts for this – but you can use your left-over holiday turkey or whole chickens too.  You can use two 5 pound chickens or cooked boned, skinned turkey.
Myrna used pimiento; I had garden peppers, so I chose those.  I like to can mine in 12 ounce jelly jars – it is the right amount for 2 of us, but you can use pint jars too.   The optional ingredients in this recipe are what I like to use; the original doesn’t call for them.

Home Canned Chicken a La King
For Poached Chicken
  6        pounds  Chicken Breast halves -- (about 3 pounds cooked meat)
  2        stalks  Celery – cut in 8 pieces
     1     Whole  Onions -- quartered
  1        teaspoon  Garlic -- minced
  4        sprigs  Fresh Thyme -- optional
  6       Dried  Sage Leaves -- crumbled-- optional
  4       tablespoons  Dried Celery-- optional
 For Canned Chicken a La King
  6-8    cups  Chicken Broth 
  4       tablespoons  Sherry -- optional
  4       tablespoons  Lea and Perrins Marinade for Chicken -- optional
  2       tablespoons  Chicken Base -- optional
  2       cups  Fresh Mushrooms -- sliced
  1       cup  Pimiento -- or red pepper
     ½   cup  Green Pepper -- chopped
  • Cut large chicken breast halves in half  lengthwise.  Add to an 8 quart stockpot with the vegetables and herbs.  Bring chicken breasts to a boil.  Cover, remove from heat, and set aside 25 minutes.  Cube meat. Strain broth and reserve 6-8 cups. Discard vegetables and herbs.
  • Combine broth, sherry, marinade, and chicken base with broth.  Keep warm.
  • Add chicken, mushrooms, peppers and pimiento to reserved broth.  Simmer 5 minutes. (If desired, put mushrooms in a glass measuring cup and cover with hot broth, and put the peppers in a glass measuring cup and cover with hot broth, let both stand a few minutes.  Then layer in jars, 4 oz. chicken per 12 ounce jar or 5 1/2 ounce per pint, then divide peppers between jars and top each jar with mushrooms.  Ladle on broth, keeping 1" headspace.  Each 12 ounce jar uses about 1/2 cup broth.)
  • Pack into hot jars, leaving 1 inch headspace. Remove air bubbles.  Adjust prepared lids and rings.  Process in pressure canner at 10 pounds pressure for 75 minutes for pints or 12 ounce jars, at 1000’ altitude.

Makes nine pint jars or twelve 12 ounce jars.

To reheat, combine 12 ounce jar with ¼ cup heavy cream mixed with 1 ½ tablespoons flour and heat until heated through and thickened, about 10 minutes.
For pints, pour your broth into a measure, add enough cream to make 1 cup, pour all but ¼ cup of the broth into the pan with the other contents of the jar.  Mix 2 tablespoons flour with the remaining liquid and pour into the pan.  Heat until heated through and thickened, about 10 minutes.
You can add peas when you reheat the mixture if desired.  Serve over toast points, puff pastry shells, rice or noodles or chow mein noodles, biscuits or waffles.

Home Canned Beef Stock


I have always used the recipe from my old Kerr Kitchen Cookbook to can beef stock.   The recipe from the Ball Book is much simpler, but, I think, much less flavorful.  They do not roast their meat and vegetables first and only use a bay leaf for seasoning.  I prefer the Kerr recipe, you’ll like it.  The Ball book calls for cooking 2-3 hours, the Kerr recipe calls for 4 hours, which I used, as I intended to can it the next day.  This makes a richer, more concentrated stock. If you think the bouquet garni is too much seasoning for you, use the plain bay leaf, depending on your end use.  You can choose to roast or not, as you wish.  This is perfect for gravies, soups and anyplace else you need beef broth or stock – and you know what is in it.   I usually can some pint jars and some half pints to have the size I need on hand.       
                          Home Canned Beef Stock
  4             Pounds  Meaty Beef Bones
  2             Quarts  Water
  1             Medium  Onion -- finely chopped
  1             Large  Carrot -- sliced
  1             Stalk  Celery -- sliced
  1             Medium  Bay Leaf
                 Salt
                 Beef Bouillon -- cubes or granules (optional)
                 Bouquet Garni (optional)
  3             Sprigs  Fresh Parsley
  3              Whole  Peppercorns
  1              Whole  Cloves
  1              Sprig  Fresh Thyme -- or 1/2 teaspoons dried thyme
  1             Medium  Bay Leaf
Prepare Stock:
Optional:  (Heat oven to 425°.  Place all bones on large roasting pan (I use my oven broiler pan).  Bake uncovered for 30 minutes.  Add vegetables and bake, turning occasionally, an additional 30 minutes or until bones are evenly browned.)  
Continue with recipe:  Remove bones and vegetables to a large stainless steel stock pot.  Add 2 cups of water to the roasting pan, scraping up browned bits.  Pour over bones and vegetables in stock pot. 
Add remaining water.  Bring to a boil over high heat.  Reduce heat to medium-low and skim off any foam.
Add bay leaf or bouquet garni (wrapped in several layers of cheesecloth or in a large tea ball).  Cover and boil gently for 2-4 hours. If a stronger flavor is desired, add bouillon.
Remove bones and discard.  Strain stock through a fine sieve or cheesecloth-lined strainer.  Discard vegetables and bay leaf.
Let cool and skim fat from stock.  It's recommended that this be done overnight in the refrigerator, after cooling, in a covered shallow pan. (The USDA recommends cooling to 70° at room temperature (not more than 2 hours), then cooling in the refrigerator.)  I cool to 85° or so in about 1 hour, then refrigerate so the temperature of the refrigerator doesn't get too warm for other foods.
Canning Stock:
Before canning, bring stock to a boil again.
Ladle hot stock into hot jars, leaving 1" headspace.  Wipe rim with a paper towel moistened with vinegar (to cut any grease).  Adjust prepared lids.
Place jars in a pressure canner.  Adjust water level, lock lid and bring to a boil over medium-high heat.  Vent steam for 10 minutes, then close vent.
Can at 10 pounds pressure for 20 minutes for pints and 25 minutes for quarts at 1000' or less.  Check your canning book for higher altitudes.  
Turn off heat.  Let pressure return to zero naturally.  Wait 5 minutes longer; then open vent; remove canner lid.  Wait 10 minutes, then remove jars, cool and store.
The Kerr Kitchen Cookbook 1990.
  "4 Pint Jars"

Home Canned Meatballs

Myrna and I have been canning meatballs from this recipe from the Better Homes and Gardens Home Canning Cook Book since the book came out in 1973.  It is always successful, and I personally have no qualms about continuing to can it despite any controversy about canning a mixture like this.  You may have to decide whether this recipe is for you, but this recipe is from 1973, not the ‘20s or ‘30’s.  Obviously, it must only be canned in a pressure canner, and they should be packed loosely as directed.  Don’t get your meatballs too big, so they get heated through, and pack loosely for the same reason.  
If you are new to canning, check out our canning basics.  
I have canned it in water or broth or in tomato or V-8 juice, depending on the end use.  I often heat the broth or water in a 2 quart measuring cup in the microwave; easy to ladle or pour from.  I use a size 60 scoop to make meatballs with minimum work.   I usually use wide-mouth pint jars to facilitate getting the meatballs out of the jar easily.
I tried another meatball recipe that is made with oatmeal instead of the bread “panade”, and it was not successful for canning– the meatballs fell apart.  
To use these, I often add 1 ½ tablespoons of flour to ¼ cup of cold water or sour cream and add it to the meatballs and broth; season appropriately, heat 10 minutes and serve over rice or noodles.    If canned in tomato liquid, thicken with tomato paste before heating and serving.              
                             Basic Meatballs
  6     Large  Eggs
6         Cups  Soft Bread Crumbs -- (about 9 ounces)
1½   Cups  Water
1       Cup  Onion -- finely chopped
1       Tablespoon  Salt
¼    Teaspoon  Pepper
 6     Pounds  Ground Beef
        Parsley, minced (optional)
 2     quarts Broth or Boiling water   (approximate)

In large bowl, combine first 6 ingredients and parsley if desired.  (Let mixture soak up water.)  Add beef; mix well.  (Do not overhandle).  Shape into 8 dozen 1 inch meatballs. (I use a size 60 scoop).
Place on shallow baking pan.  Bake at 425° for 15 minutes.
Pack loosely into hot jars, leaving 1 inch headspace.  Add boiling water or meat juice, leaving 1" headspace. Adjust lids. (About 12 meatballs per pint; 8 meatballs for 12 ounce jar).
Process in pressure canner at 10 pounds pressure for 75 minutes (for up to 1000‘ altitude).
  "8 Pint Jars"

Home Canned Bean Soup

I’ve been canning this recipe from the "Better Homes and Gardens Home Canning Cookbook" since 1973.  The optional ingredients are not in the original recipe; in 38 years, any recipe is bound to get modified a little.  If you use the optional ingredients, it makes 6 pints, if not, it makes 4 pints.  I usually make 3 times this recipe and can it in 2 canners - that's usually enough for a year's supply for us and we can share some. 
That’s how much we like bean soup.  I do can it in pints; when we have drop-in company, I just use more jars.  This old recipe makes delicious soup of just the right consistency; no "bean bricks" or mushy soup.
The biggest advantage to canning bean soup, besides the obvious one of having it ready in 10 minutes, is that we don’t have to eat bean soup for days.  I can serve it whenever we want and it tastes like the best homemade soup with no fuss and no leftovers.  That gives me plenty of time to make corn bread to go with (our favorite).
I often can this in the “off-season”; after the garden canning is completed or perhaps after the New Year.  We like ham shank; I have to ask for this at our grocery meat counter; they keep it in the back.  If you use ham, you may want a ½ teaspoon of salt per pint.  I usually chop my vegetables the day before to reduce the stress on canning day.
Ham Bean Soup
  1            pound  Dried Navy Beans -- or mixed soup beans or Great Northern beans or red beans
  1 ½       quarts  Water -- or chicken broth
  1           tablespoon  Garlic – minced (optional)
     ½       pound  Onion -- chopped
  5           stalks  Celery -- sliced (optional)
  6           ounces  Carrots -- 1/4" slice (optional)
1 ½ -2#   ham shank or a meaty ham bone or ½ pound ham
  1           Bay Leaf, Whole
              Parsley, chopped - to taste
  6           whole black peppercorns.
  • Soak beans 8-12 hours.  Drain and rinse.  (Or rinse beans, add to 2 quarts water.  Bring to boiling; reduce heat and simmer 2 minutes.  Remove from heat; cover and let stand 1 hour, then drain and rinse.)
  • Cover the drained beans with water or chicken broth; add shank, peppercorns and bay leaves (in a spice bag or tea ball), parsley and garlic.  Simmer; covered, 1 hour, adding carrots, celery and onions last 15 minutes.  Remove spice bag and ham bone, cut off meat and dice in 1" pieces. 
  • Wash jars; keep warm until filling. Prepare lids according to manufacturer's instructions.
  • Divide ham among jars.  Using a slotted spoon, ladle hot solids into hot jars, about 3/4 full.  Fill with liquid from cooking the ham and beans, leaving 1" headspace.  Use hot water to fill if you don't have enough broth.  Remove bubbles with plastic knife and wipe jar rim carefully before sealing.  
  • Cover and seal, place in pressure canner (with 3 quarts simmering water), exhaust steam 10 minutes, process in pints 1 hour and 15 minutes at 10# pressure (for up to 1000’ elevation), quarts for 1 1/2 hours.  
  • Let pressure drop of own accord ( about 30 minutes), open canner, remove jars to clean towel and let cool and seal, setting apart to allow air to circulate. Remove rings and wash jars carefully.

Yield:  6 pints if using carrots and celery, 4 pints without.
Equipment:  Stock pot or Dutch oven, chopping board, pressure canner, 13 x 9" pan with paper towel for jar filling, jars, lids and rings, funnel, lid magnet, jar lifter, plastic knife, small saucepan for lids, 4 quart measure for water, clean towels, stock pot to keep jars warm if necessary.
TO SERVE:  Add water to the top of the jar (just to make it a full jar and thin it a little bit if necessary), pour into a saucepan and heat 10 minutes.  1 pint makes 2 cups of soup.
2011 cost:  56¢ per jar with carrots and celery.  Sale bulk beans – 4# for $2.39 and sale ham $1.68 per pound.