Showing posts sorted by relevance for query measuring dry pasta. Sort by date Show all posts

Make It Yourself...Measuring Dry Pasta

I don’t attempt to make many shapes of pasta, finding the dried pastas I can purchase are good quality, and conveniently store in the pantry. 
When you cook pasta, 2 ounces of dry pasta per person is what most pasta packages recommend.  What does 2 ounces of dry pasta look like? It depends on the shape. I really like to measure pasta by weighing it.  I’m always sure I have enough pasta for the recipe.  But below are amounts of dry pasta for 2 ounces of some of the common shapes if you don’t have a scale.  I tried them in several brands of measuring cups as I have an assorted lot, and the results were about the same.
If you use a lot of long pasta, I thought one of those pasta measures with holes in it would be handy if you don’t have a scale. But enough pasta to fill the 1 serving hole weighed almost 4 ounces.  However, my trusty tape measure got the same results as the chart.
Clockwise, top left: Wide noodles - 1 cup, 
bowties - 3/4 cup,
medium shells - 3/4 cup, 

campanelle - 3/4 cup, 
orzo - 1/3 cup
I admit I usually use less than 2 ounces per person, often using that amount for both my husband and myself, as we usually fill out our meals with a side salad and vegetables.  It depends on what else is added to that serving of pasta too.  Simple mac and cheese needs more pasta than a dish combining both meat and vegetables with the pasta.


MEASURING PASTA
DRY PASTA - 2-OUNCE SERVING
CUPS COOKED PASTA
Angel Hair
2-1/8 inches (circumference)
1 cup
Fettuccine
2-1/8 inches (circumference)
1 cup
Linguine
2-1/8 inches (circumference)
1 cup
Spaghetti
2-1/8 inches (circumference)
1 cup
Campanelle
3/4 cup
1-1/2 cups
Elbows
1/2 cup
1-1/8 cups
Farfalle (bow ties)
3/4 cup
1-1/4 cups
Medium Shells
3/4 cup
1-1/8 cups
Penne
2/3 cup
1-1/4 cups
Rotini
1/2 cup
1 cup
Ditalini
1/3 cup
1-1/4 cups
Orzo
1/3 cup
2/3 cup
Large Shells
7-8 shells
1-1/4 cups
Wide Curly Noodles
1 cup
1 1/2 cups

Make it Yourself...Pasta Making Hints

Amish Noodle Day
We love homemade pasta. I have rolled these out by hand, like my mother-in-law - but I purchased the roller – cutter set for my Kitchenaid mixer, and they are great! Once I got a system down (where to hang the noodles, that I need a cutting board next to the mixer so I can flour my dough between rollings, etc. ) I actually enjoy making noodles for the freezer. So much so, I don’t buy noodles anymore. My husband likes to help if he’s home because it’s fun and he was raised on homemade noodles. They are much, much cheaper and better than purchased fresh or frozen noodles.  Fresh noodles cook quickly; if I freeze them, I don't thaw them before cooking.  They keep up to 6 weeks in the freezer - I never have them that long.
Watch a few U-Tube pasta making videos from Kitchenaid before you start. Then I’ll tell you what I didn’t learn from the videos. Leave yourself a couple of hours – they aren’t that much work, but there is some waiting time.
• Farm eggs are not sized, so I have learned to put them in a measuring cup until I get the amount I want. Then I add flour accordingly. If I have ¾ cup, that’s good and I use about 11 ½ ounces flour. If I crack that last egg and have about 7/8 cup, I use 12 ounces of flour or so. Don’t leave out the salt – they taste yucky.
• Your dough ball after you take it out of the mixer will be very stiff and hard, that’s OK, it will soften a lot as it rests. When you cut the dough into the first pieces, it shouldn’t have large holes in it – it’s not kneaded enough if it does – put it back and knead some more.
My Pasta drying before cutting on a clothes rack
• I cut my dough into 5-6 pieces that are about 3 ounces each – in a recipe that’s about equal to 2 ounces of purchased dry noodles. I found that cutting the dough (I weigh it) before I let it rest, I can just start rolling after 20 minutes. This amount is right for the 2 of us, if I have company, I just cook more. This size of dough is a good size for getting into the pot without sticking together.
• I purchased a $5 stainless flour shaker that is swell for flouring the dough between times through the rollers. If the dough is a little sticky, I lay it on my board, shake a little flour over it and it’s ready to roll.
• After flattening the dough a little, I feed it through the rollers, flour one side, fold the unfloured side to the inside in thirds, then turn so the open end goes through the roller and roll again. I didn’t understand this fold and turn step at first, but having the folds on the sides as you feed them through helps keep your dough straight on the sides which helps when cutting it into noodles.
• The first rolling and folding is also a kneading operation. Don’t skimp on it – you don’t want crumbly noodles – rolling helps align the gluten strands and makes better noodles.
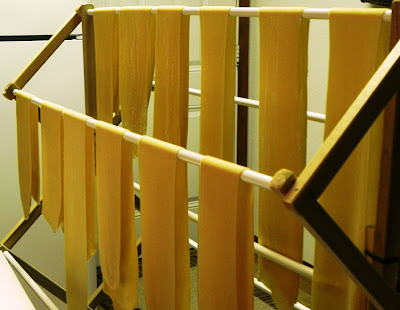
You need to dry your pasta dough between rolling and cutting if you use a pasta machine of any kind.  I use either these drying racks or a clean clothes drying rack.
• To get your noodles to run through the cutters successfully, you need to let them rest until the dough is almost dry to the touch, but not crackly. It takes a few times to get the feel of this, but the worst thing that happens is that you have to pull some of them apart by hand. If this happens, let the rest dry a little more. By the time you’ve made your first batch of noodles, you’ll have a pretty good feel for it.
Egg noodles actually freeze very well. Swirled into single-portion nests, you can freeze them separately and then bag them for long-term (at least a couple of months) freezing. When you want to cook your frozen pasta, it can go straight from the freezer into the boiling water, and you probably won’t notice a difference in cooking time.

Frozen pasta maintains its form, and its fresh flavor, better than the dried version
Next Wednesday, we'll give you our basic egg noodle recipe and methods.

Homemade Noodles

We love homemade pasta. Especially since my brother-in-law brings us eggs from his acreage every other week. His eggs make our noodles rich and golden.
No, I’m not going to tell you how to roll these out by hand - I purchased the roller – cutter set for my Kitchenaid mixer, and they are great! Once I got a system down (where to hang the noodles, that I need a cutting board next to the mixer so I can flour my dough between rollings, etc. ) I actually enjoy making noodles for the freezer. So much so, I don’t buy noodles anymore. My husband likes to help if he’s home because it’s fun and he was raised on homemade noodles. They are much, much cheaper and better than purchased fresh or frozen noodles.  Fresh noodles cook quickly; if I freeze them, I don't thaw them before cooking.  They keep up to 6 weeks in the freezer - I never have them that long.
Watch a few U-Tube pasta making videos from Kitchenaid before you start. Then I’ll tell you what I didn’t learn from the videos. Leave yourself a couple of hours – they aren’t that much work, but there is some waiting time.
• Farm eggs are not sized, so I have learned to put them in a measuring cup until I get the amount I want. Then I add flour accordingly. If I have ¾ cup, that’s good and I use about 11 ½ ounces flour. If I crack that last egg and have about 7/8 cup, I use 12 ounces of flour or so. Don’t leave out the salt – they taste yucky.
• Your dough ball after you take it out of the mixer will be very stiff and hard, that’s OK, it will soften a lot as it rests. When you cut the dough into the first pieces, it shouldn’t have large holes in it – it’s not kneaded enough if it does – put it back and knead some more.
• I cut my dough into 5-6 pieces that are about 3 ounces each – in a recipe that’s about equal to 2 ounces of purchased dry noodles. I found that cutting the dough (I weigh it) before I let it rest, I can just start rolling after 20 minutes. This amount is right for the 2 of us, if I have company, I just cook more. This size of dough is a good size for getting into the pot without sticking together.
• I purchased a $5 stainless flour shaker that is swell for flouring the dough between times through the rollers. If the dough is a little sticky, I lay it on my board, shake a little flour over it and it’s ready to roll.
• After flattening the dough a little, I feed it through the rollers, flour one side, fold the unfloured side to the inside in thirds, then turn so the open end goes through the roller and roll again. I didn’t understand this fold and turn step at first, but having the folds on the sides as you feed them through helps keep your dough straight on the sides which helps when cutting it into noodles.
• The first rolling and folding is also a kneading operation. Don’t skimp on it – you don’t want crumbly noodles – rolling helps align the gluten strands and makes better noodles.
   You need to dry your pasta dough between rolling and cutting if you use a pasta machine of any kind.  I use either these drying racks or a clean clothes drying rack.
• To get your noodles to run through the cutters successfully, you need to let them rest until the dough is almost dry to the touch, but not crackly. It takes a few times to get the feel of this, but the worst thing that happens is that you have to pull some of them apart by hand. If this happens, let the rest dry a little more. By the time you’ve made your first batch of noodles, you’ll have a pretty good feel for it.
Here's my recipe for Basic Egg Noodles.

Cooking with Lard...Never Fail Lard Biscuits


After I found a good source for lard I turned to my 60’s and 70’s Farm Journal Cookbook collection, where lard is listed as the FIRST choice of fat in this recipe for biscuits. They called them “never fail” so I figured I couldn’t go too far wrong.  At about 7¢ you can't beat 'em.


I keep the lard I am currently using either in a fruit jar or a covered measuring cup in the refrigerator. It was cool when I measured it out for this recipe; I think that made it easier to cut in.  
I cut the recipe in half for the 2 of us, expecting some leftovers. Wrong this time! My husband’s first comment was “Now THIS is GOOD!” The biscuits are very light, as you can see, tender, but not crumbly. Even the ones I patted out to use the scraps were tender. The dough is very easy to work with, I sprinkle my board with flour I keep in a $5 stainless steel shaker for making pasta.
If I’m in a hurry, I just cut my biscuits into squares with a sharp bench knife. If you use a cutter or knife, be sure to cut straight down; do not twist, to get a good even rise and that “split” in the middle of your biscuit.


Never-Fail Baking Powder Biscuits

2 cups Flour, All-purpose – sifted (9 ounces)
1 tablespoon Baking Powder  
1 teaspoon Salt
1/3 cup Lard
3/4 cup Milk  

Sift dry ingredients together. Cut in lard until mixture resembles coarse meal or crumbs.
Make a hollow in the flour-shortening mixture and stir in enough milk to make a soft dough that leaves the sided of the bowl and sticks to the mixing fork.
Turn onto a lightly floured surface and knead with the heel of the hand 15 times. Roll 1/2" thick.
Cut with a 2" cutter; place close together on a baking sheet for soft sides, 1" apart for crusty sides on ungreased baking sheet. I use parchment paper.  Bake in very hot oven (450°) for 10-12 minutes. Serve at once.
If using self-rising flour, omit baking powder and salt.

12 biscuits          
"Homemade Bread" By Farm Journal - 1969

March 2019 cost: 7¢ per biscuit

Per Serving: 124 Calories; 5g Fat (36.5% calories from fat); 3g Protein; 17g Carbohydrate; 1g Dietary Fiber; 6mg Cholesterol; 307mg Sodium.