Showing posts with label Homemade Mixes. Show all posts

Small Recipes ...Homemade Biscuit Mix Pancakes for Two


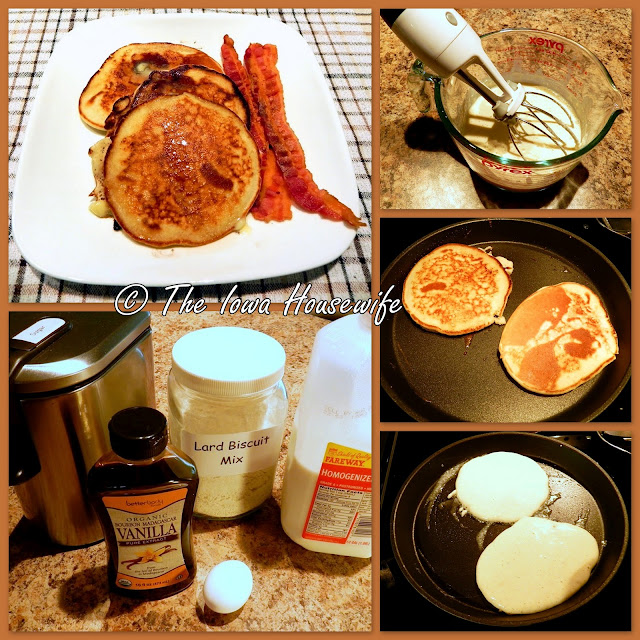
I wanted to try my Homemade Martha White Lard Biscuit Mix in pancakes…just for two servings.  It worked!  Of course, you can make your biscuit mix with shortening if you wish, or Original Bisquick works just fine too.    You can thin your batter the way you like.  This makes 4 nice-size pancakes – I have two omelet pans so I used both to get these to the table quickly.   We liked these so much I had to buy a small electric griddle so we could enjoy them more often.            

                       Homemade Biscuit Mix Pancakes for Two
  3           ounces  Lard Biscuit Mix, Martha White 
     1/3    cup  milk + 1 tablespoon if needed
  1           large  egg
   1  1/2    teaspoons sugar
     1/2    teaspoon  vanilla
Beat all ingredients with a hand beater until smooth.  Only add the extra milk if the batter isn't thin enough for your taste.
Grease a heated griddle at 375° or a skillet over medium high heat; pour scant 1/4 cup batter on hot griddle for each pancake.
Cook until pancakes are dry around the edges.  Turn; cook other side until golden brown.  Keep warm until all are done.
Yield:    "Four 4" inch pancakes"


Martha White Biscuit Mix
                        1 QUART MIX
  1           pound self-rising flour -- sift first (4 cups)
  4          ounces  lard or shortening -- 1/2 cup
Cut shortening into flour with pastry blender or food processor until it resembles coarse crumbs.
Store in a tightly covered container at room temperature (If using shortening).  Refrigerate if using lard.
Mix will keep well up to 4 months on the shelf if using shortening or in the refrigerator if using lard. 
Recipe weighs 20 ounces; 1 cup recipe weighs 5 ounces.                                

Small Recipes...Homemade Biscuit Mix Cinnamon Twists


Somebody absconded with a donut hole!  
Here’s a simple treat made with my homemade biscuit mix recipe from the Martha White Southern Sampler cookbook.   If you don’t put all the cinnamon-sugar on the plate for dipping, you can save any you don’t use for cinnamon toast, if you have any left, that is!    I use my doughnut cutter to make fancy twists…you can cut them out with a biscuit cutter and use bottle cap to cut the center, or just leave them round without twisting for that matter.   My doughnut cutter is 2 3/4" across with a 1 1/4" inch center cutter.                
I can make a very small amount with no waste and no leftovers…perfect.  You can even cut this in half and have just enough for 1 person!  I weigh my mix to ensure success every time.    
                             Cinnamon Twists
     1/4    cup  milk
  4           ounces  Homemade or purchased Biscuit Mix (a scant cup)
  1 1/2    tablespoons  butter -- melted
     1/2    cup  sugar
     1/2    teaspoon  cinnamon
Preheat oven to 450°.  Melt butter in shallow sauce dish in microwave.  Prepare cinnamon-sugar to taste in custard or glass measuring cup; spread some of it in a paper plate, adding more to the plate as needed (save any unused leftovers for cinnamon toast). Line with parchment or lightly grease a quarter-sheet pan (12 x 9") or a cookie sheet.
In small bowl, combine milk and biscuit mix with fork just until it pulls away from the side of the bowl; let set in bowl 4-5 minutes.  Knead dough lightly 8-10 times on a floured board.  Roll dough out to 1/4 inch thickness into a square that will make 4 biscuits with your doughnut cutter.  Cut into rounds with the floured doughnut cutter. 
Dip each biscuit into melted butter, then into mixture of sugar and cinnamon.  Twist once and place about 1 inch apart on baking sheet or line with parchment paper.  Dip the centers the same way.
Bake at 450° for 10-12 minutes.
Remove to rack for a few minutes; serve warm.
Makes 4 small treats…about 2 servings.

Martha White Biscuit Mix
                        1 QUART MIX
  1           pound self-rising flour -- sift first (4 cups)
  4          ounces  lard or shortening -- 1/2 cup
Cut shortening into flour with pastry blender or food processor until it resembles coarse crumbs.
Store in a tightly covered container at room temperature (If using shortening).  Refrigerate if using lard.
Mix will keep well up to 4 months on the shelf if using shortening or in the refrigerator if using lard. 
Recipe weighs 20 ounces; 1 cup recipe weighs 5 ounces.                                
                        TO PREPARE 5-6 BISCUITS:
  5       ounces  biscuit mix
  5-6 tablespoons  milk or buttermilk (3/8 cup)
TO PREPARE BISCUITS:
Preheat oven to 450°, toaster oven to 425°.  Lightly grease or line a baking sheet with parchment.
Add milk to mix.
Stir with a fork only until dough leaves sides of bowl.  Turn dough out onto lightly floured board; knead gently just until smooth, about 10-12 times.
Roll out to ½  inch thickness.  Cut into rounds with a floured 2 inch cutter.  Turn over when placing on baking sheet.
Bake 15-18 minutes or until golden brown.
Yield:  "1 quart" of mix


Biscuit Mixes...Homemade Martha White Biscuit Mix

This recipe is so simple! Just two ingredients.  I'll be sharing small recipes that use this mix over the next few weeks; it successfully substitutes for Bisquick original mix in everything I've tried.   Why don't you try a batch for biscuits, and then try some of the small recipes over the next few weeks.

My husband especially likes lard biscuits, and I’ve been looking for a biscuit mix I could make that used lard.  You can use shortening just as well.  Many homemade biscuit mixes use powdered milk; you never know whether they are using the fluffy instant type or the more powdered kind; that throws off any measuring.  I also found it tended to settle out.
Cut with a bench knife in squares  
Then I picked up a Martha White cookbook Southern Sampler and found the answer…an easy recipe using self-rising flour and either shortening or lard; you use liquid milk or buttermilk when mixing your biscuits to use. 
The original recipe made 2 quarts of mix, I’m giving a 1 quart size that I use; and a 1 batch recipe to see if you like the recipe.  The 5 ounce recipe makes half of a regular 2 cup biscuit recipe.  The quart size recipe is what I can conveniently make in my food processor.
I didn’t find I needed to change the amount of liquid whether I used whole milk or buttermilk.   I use non-hydrogenated lard that must be refrigerated, not the stuff on the shelf in a box.  The mix must be refrigerated if you use this kind of lard or homemade lard.  You can also  use shortening, then the mix is easy to store in your cupboard.  
             
                 Martha White Biscuit Mix
                        1 QUART MIX
  1           pound self-rising flour -- sift first (4 cups)**
  4          ounces  lard or shortening -- 1/2 cup
                        1 BATCH BISCUIT MIX RECIPE
  4        ounces  self-rising flour**
  1        ounce  lard -- 2 tablespoons
Cut shortening into flour with pastry blender or food processor until it resembles coarse crumbs.
Store in a tightly covered container at room temperature (If using shortening).  Refrigerate if using lard.
Mix will keep well up to 4 months on the shelf if using shortening or in the refrigerator if using lard. 
The quart recipe weighs 20 ounces; 1 cup recipe weighs 5 ounces of mix.                                 
**Martha White says to use 1/2 tablespoon of baking powder and 3/8 teaspoon salt sifted for EACH cup of all-purpose flour if you don't have self-rising flour when making the mix.

                        TO PREPARE 4 BISCUITS:
  4             Ounces  biscuit mix
     1/4       cup  milk or buttermilk
                        TO PREPARE 5-6 BISCUITS:
  5       ounces  biscuit mix  (about 1 cup)
  5       tablespoons ounces  milk or buttermilk
                        TO PREPARE 10-12 BISCUITS:
10       ounces  biscuit mix  (about 2 cups)
 5/8     cup  milk or buttermilk

TO PREPARE BISCUITS:

  1. Preheat oven to 450°, toaster oven to 425°.  Lightly grease or line a baking sheet with parchment.
  2. Set your bowl on your scale and measure in mix.  Add milk to mix.  (Or stir mix; spoon into cup and level.  Add to bowl, add milk to mix.)
  3. Stir with a fork only until dough leaves sides of bowl.  Turn dough out onto lightly floured board; knead gently just until smooth, about 10-12 times.
  4. Roll out to 1/2-3/4  inch thickness.  Cut into rounds with a floured 2 inch cutter.  Place on baking sheet.
  5. Bake 12-15 minutes or until golden brown.
  6. You can use your instant read thermometer to see if they are done inside; 200°.

Saturday Thoughts...Homemade Pan Release


 Sue and I were chatting about Bundt pans at coffee this morning. That reminded me that we had posted a few years ago a recipe for Homemade Pan Release. I still use it though not as often as I don’t do as much baking. I really don’t like spray pan releases and don’t use them and this is so much easier and cheaper than buying them or greasing a pan and then flouring it and making a mess while doing it. 
 You can make a small amount for just one or if you still bake a lot, a larger amount in just a few minutes and it keeps well. I have stored it just fine in the cupboard but if it is warm in your house or you are making a larger amount you might want to store it in the refrigerator. Either way seems to work fine. Do be sure to use vegetable shortening or if using lard (which I haven’t tried) the lard should be at room temperature to start.

 This works so well that I wanted to post it again for our newer readers and for our older readers who might have missed it the first time around.
 I have seen directions where they whip it with a mixer but I find a fork works just fine and is a lot less work and mess.

Directions:
 Take two parts of shortening to one part of flour, such as one cup of shortening to one half cup of flour. With a fork mix well and store in an air tight container either on a shelf in a cool and dark cupboard or in your refrigerator. If storing in refrigerator it might be easier to work with if your take it out a little early to warm some.
 Using a pastry brush, napkin or paper towel spread in your pan. Ergo, shortening and floured all at once!


Homemade Pan Release


 I recently saw the directions for making a flour and shortening mix for greasing baking pans. Then when I bought some older Pillsbury paperback  cookbooks at a used book sale there it was again. Must be that I was meant to make it, I thought. 
 Well, I had a bundt cake I was wanting to try and I know any of you who have tried to grease a bundt pan and then flour it know what a pain that is. I really don’t like sprays as they are hard to wash out of the pan afterwards and I think they leave an aftertaste.


 This could not be simpler to make or use. Just be sure you use shelf stable shortening like Crisco. I made just a small amount to test it and now will make a larger amount to have on hand with all of the holiday and winter baking coming up. 
Directions
 Take two parts of shortening to one part of flour, such as one cup of shortening to one half cup of flour. With a fork mix well and store in an air tight container either on a shelf in a cool and dark cupboard or in your refrigerator. If storing in refrigerator it might be easier to work with if your take it out a little early to warm some.


 Using a pastry brush, napkin or paper towel spread in your pan. Ergo, greased and floured all at once!

Use It Up...Mushroom Soup to Freeze

 The Southern Living 2014 Annual cookbook has a recipe for Cream of Mushroom Soup which can be used instead of the red and white can we are all so familiar with.
It needs to be kept frozen and thawed to use. There is flour in the recipe and of course it is thick so it can not be canned.
 After reading the recipe I decided to try it. It is easy to do, has no preservatives, and with cream, butter, cream cheese and mushrooms how could you go wrong. It does use the concentrated chicken stock in the tubs or sticks. I use Knorr Brand because we like the flavor. Do not use liquid stock or it will dilute the soup too much.
  My Grandson and Bettie liked it made into soup, use like the can and add a equal amount of milk and heat. You can use this in any recipe calling for condensed cream of mushroom soup. 1 and ¼ cups is equal to each can called for in your recipe.
  I froze ours in 5 ounce amounts (by weight) to equal a ½ can as we like to make a smaller amount of most casseroles. You can always thaw two or more as needed. We like it so well that I am going to see if I can make a version of cream of celery. 
Sue made this after I did and froze hers in flat freezer bags Makes amount equal to 4 cans 
Cream of Mushroom Soup
½ cup butter divided
24 ounces fresh mushrooms (3-8oz. containers)
1/3 cup all purpose flour
2 cups whipping cream
1 (8 oz.) package cream cheese softened
2 (1 ounce) containers concentrated chicken stock (from a 4.66-oz. package)
Clean and chop mushrooms.  Melt 3 tablespoons butter in a dutch oven over medium-high heat; add chopped mushrooms and sauté 10 to 12 minutes until most of the liquid is evaporated. Transfer to a bowl. 
 Lower heat to medium. Melt remaining butter in dutch oven you used for mushrooms. Whisk in flour until smooth; whisk one minute more. Gradually whisk in cream and than cream cheese and concentrated chicken stock. Cook, whisking constantly, 2 minutes or until melted and smooth. Remove from heat and stir in cooked mushrooms.
 Use immediately, or cool completely.  Freeze in 1 ¼ cup portions in plastic freezer bags or containers. Thaw before using.
To use for soup add an equal amount of milk and heat.
Use in any hot dish the same as any condensed soup called for.

Basic Cocoa Syrup


We like to know what’s in our cocoa; and this syrup from "Farm Journal Thrifty Cook" takes just minutes to prepare, and blends with milk perfectly, without any grittiness.   I still like Hershey’s plain, unsweetened cocoa for good flavor.
They intended this recipe as a make-ahead for parties, but I make the smaller amount for us, that lasts us several days.   Myrna likes it with a little bit of coffee added.
Use a large enough pan, it boils up quite a bit.  It is not canned; it is just stored in a glass jar in the refrigerator until used.              

                     Basic Cocoa Syrup
10 Servings
40 Servings

½ cup
2 cups
Unsweetened Cocoa Powder
1 cup
4 cups
Sugar
1/16 teaspoon
¼ teaspoon
Salt
1 cup
4 cups
Boiling Water
1 teaspoon
4 teaspoons
Vanilla Extract
For One Serving
For Six Servings
Hot Cocoa
1 cup
6 cups
Milk
2 tablespoons
¾ cup
Basic Cocoa Syrup
1 ¼ Cups
1 ¼ Quart
Total Syrup

1.      Combine cocoa, sugar, sugar and salt in saucepan (a whisk works well for this).  Gradually add boiling water, stirring until mixture is smooth. (I microwave my water in the measuring cup).
2.      Cook over medium heat, stirring until mixture comes to a boil.  Boil 1 minute without stirring.
3.      Remove from heat and cool; stir in vanilla.  Pour into glass jar; cover and refrigerate until needed.
To make cocoa, heat milk until bubbles form around edges of pan.  Add Basic Cocoa Syrup, stirring until well-blended with milk.  Pour into hot mugs.   (Stir or shake the cocoa syrup before measuring into pan or cups to make sure chocolate hasn't settle to the bottom of the mixture.)
Alternately, mix as above, microwave in cups or large measuring cup, 1-2 minutes per serving or until as hot as desired.
2016 Cost:  35¢ per serving with milk
Myrna Says:
Lyle and I like this recipe a lot and often I add coffee flavoring to the syrup mixture, try about 1/8 teaspoon for the 10 servings recipe.  Frontier is the brand I buy or you could use a coffee flavored liquor if you are serving just to adults. The liquor I add to each cup when preparing it.

Basic Oats Mix Biscuits, Muffins, Applesauce Bread and Dumplings

Here are the recipes that the “Culinary Institute the Budget Cookbook" gives with their recipe for Basic Oats Mix (I included the recipe at the bottom).  I have made both the muffins and biscuits and found them to be both quick and tasty.
I included the recipes for the bread and dumplings, although I haven’t tried them yet.

Oatmeal Muffins
  2              cups  plus 2 tablespoons Oat Mix  
     1/4       cup  Sugar
  1              cup  Milk
  1              large  Egg -- beaten
FOR MUFFINS: 
Combine oats mix and sugar in a bowl.  Add milk and egg; stir until just blended.
Fill 12 greased 2 1/2" muffin-pan wells 2/3 full.
Bake at 400° about 20 minutes, or until golden brown.
Cost:  about 96¢ per dozen or 8¢ per muffin

Oatmeal Biscuits
  2               cups  Oat Mix
     2/3        cup  Cold Milk
FOR BISCUITS: 
Combine oats mix and milk in a bowl; stir with a fork to a soft dough.  Let the dough set in the bowl to absorb some of the liquid into the oats, about 5-10 minutes.
Turn dough onto a lightly floured surface.  Knead with fingertips 10 times.  Roll out 1/2" thick and cut with a floured 2" cutter.  (Be sure to cut straight down without twisting, to help your biscuits rise and get that characteristic “split”.)
Put on ungreased cookie sheet. 
Bake at 450° 10-12 minutes.
Biscuits cost 54¢ per dozen or 4 1/2¢ per biscuits.

Quick Applesauce Bread
  2 1/4    Cups  Oat Mix
  1           Cup  Sugar
  1           Teaspoon  Cinnamon
  1           Cup  Applesauce -- sweetened
  1           Large  Egg
     1/2    Cup  Milk
     1/2    Cup  Raisins – optional
FOR APPLESAUCE BREAD: 
Combine oats mix, sugar and cinnamon in a bowl.  Add applesauce, egg, milk, and raisins; stir until mixed.
Turn batter into a greased and floured 8 1/2 x 4 1/2 x 2 1/2" loaf pan.
Bake at 350° for 55 to 60 minutes.
Remove from pan and cool completely on a rack before slicing.  1 loaf

Fluffy Dumplings
  2           Cups  Oat Mix
  1           Cup  Milk

FOR DUMPLINGS:
Thoroughly combine oats mix and milk.  Spoon onto boiling stew. (Try to drop them on the meat or vegetables to keep them from getting too soggy).  
Cook, uncovered, over low heat 10 minutes; cover and cook 10 minutes longer.  10-12 Dumplings.

Basic Oats Mix
  6        Cups  Flour, All-purpose (about 1 pound 11 ounces)
  4        Tablespoons  Baking Powder
  4        Teaspoons  Salt
  1 1/3 Cups  Shortening (about 9.33 ounces)
  2        Cups  Oats -- quick or old fashioned, uncooked (about 6 ounces)
Sift flour, baking powder and salt together in a large bowl.  Cut in shortening until mixture resembles coarse crumbs.  Stir in oats.
Store in a cool, dry place until ready to use.
Makes enough for 4 batches muffins, biscuits, dumplings or applesauce bread.
Cost:  $1.67 per full recipe or 17¢ per cup if you get 9 3/4 cups from the recipe.

Yield:  "9 3/4 Cups"

Culinary Institute the Budget Cookbook" 1975

Basic Oats Mix

Here’s an interesting take on homemade biscuit mix from the “Culinary Institute the Budget Cookbook” from 1975, a book I picked up at our local thrift shop. 
Tomorrow, I’ll give your some of the recipes to use this mix.  I used the old-fashioned oats, but you can also use quick-cooking oats. 
               
                              Basic Oats Mix
  6        Cups  Flour, All-purpose (about 1 pound 11 ounces)
  4        Tablespoons  Baking Powder
  4        Teaspoons  Salt
  1 1/3 Cups  Shortening (about 9.33 ounces)
  2        Cups  Oats -- quick or old fashioned, uncooked (about 6 ounces)
Sift flour, baking powder and salt together in a large bowl.  Cut in shortening until mixture resembles coarse crumbs.  Stir in oats.
Store in a cool, dry place until ready to use.
Makes enough for 4 batches muffins, biscuits, dumplings or applesauce bread.
Cost:  $1.67 per full recipe or 17¢ per cup if you get 9 3/4 cups from the recipe.

Yield:  "9 3/4 Cups"

Taco Seasoning


 The last time I made tacos I stopped to read the ingredient list on the back of the taco seasoning mix package. I was startled to see the first ingredient listed was Maltodextrin, than cornstarch and sugar was the third ingredient listed. I had a recipe I had been wanting to try so as Bettie is diabetic and I have celiac, (no maltodextrin for me) I made this for our tacos. 
  Sue has a recipe listed also, this will give you a choice. The recipe makes enough for 1 pound of ground beef. I like the idea of just making enough to use at one time and it took about five minutes. The cost of a package at the store was a dollar and nine cents and this used spices I have on hand all the time, so I counted it as no cost or at the least just pennies to make.
  The next time I will add a little more crushed red pepper to the mix, just as we wanted it a little hotter. Note there is no cornstarch in this recipe, just spices.
Add about two to three tablespoons of water to browned and drained meat and heat for 3 minutes before serving.
  Taco Seasoning
For 1 pound of ground beef
1 teaspoon salt
½ teaspoon chili powder
¼ teaspoon pepper
¼ teaspoon cumin
¼ teaspoon oregano
Pinch crushed red pepper or to taste
Mix and use.

Here's another good recipe to use your taco seasoning:    Cobre Valley Casserole

Taco Seasoning Mix


I don’t like to store little packets of seasoning I might not use again soon, so I use this mix for taco seasoning.  It’s from the great cookbook, Make a Mix.
                            Taco Seasoning Mix
  2          Teaspoons  Instant Minced Onion
  1           Teaspoon  Salt
  1           Teaspoon  Chili Powder
     ½       Teaspoon  Cornstarch
     ½       Teaspoon  Crushed Dried Red Pepper
     ½       Teaspoon  Instant Minced Garlic
     ¼       Teaspoon  Dried Oregano
     ½       Teaspoon  Ground Cumin
Combine all ingredients in a small bowl until evenly distributed.  Spoon mixture onto a 6 inch square of aluminum foil and fold to make airtight.
Label with date and contents.  Store in a cool, dry place; use within 6 months.
Makes one package or about 2 tablespoons.
  "Make a Mix "
Yield:  "1 Package"
Per Serving: 18 Calories; 1g Fat (28.7% calories from fat); 1g Protein; 3g Carbohydrate; 1g Dietary Fiber; 0mg Cholesterol; 2159mg Sodium.  Exchanges: 0 Grain(Starch); 0 Lean Meat; 0 Fat.

Flexible Mexican Filling


We like enchiladas and other Mexican-flavored foods, so I thought I would give this recipe a try from Cheap, Fast, Good!  The issue of the book I have had a typo in this recipe, so I checked online  and sure enough, the authors had a corrected recipe online   
My home-ground beef is pretty lean, so I just soaked up a little of the remaining fat from the beef and onions with a paper towel (held with a tongs).    
I let this cook and put it up in freezer bags that I can store flat in the freezer.  I find the bags thaw quickly.  I used my big electric frying pan to cook this – it’s deep enough to reduce any spattering.  I used the taco seasoning recipe from the cookbook Make a Mix.  We liked this in enchiladas, and I gave some to Myrna that she used in turnovers.
Flexible Mexican Filling
1 pound ground beef 
1 large onion (for about 1 cup chopped)
½ package (2 tablespoons) taco seasoning 
1 can (10¾ ounces) condensed tomato soup
2 cups shredded Cheddar cheese or Mexican-blend cheese
1 cup (8 ounces) sour cream*
Place ground beef in an extra-deep, 12-inch nonstick skillet over medium-high heat. Begin browning the meat, stirring frequently, while peeling and coarsely chopping onion, adding to skillet as you chop. Cook, stirring frequently to break up meat, until it is completely browned and finely crumbled, about 4 to 5 minutes. Drain any accumulated fat from beef, if necessary.
Reduce heat to medium-low. Add taco seasoning and tomato soup, and stir until well blended. Add cheese, and stir until it melts, about 30 seconds. Remove skillet from heat, and stir in sour cream until well combined. Serve at once, or store for future use.*
Cooking Notes
*Reduced-fat sour cream can be used, but do not boil sauce once it has been added or it will curdle.
Can be refrigerated for up to 2 days or frozen for 2 to 3 months. *Refrigerate or freeze in 1-cup portions in airtight containers. To defrost frozen filling, place container in the microwave, and microwave on defrost setting according to manufacturer’s instructions. Or, place frozen filling in refrigerator overnight; then reheat.

Taco Seasoning Mix
  2          Teaspoons  Instant Minced Onion
  1           Teaspoon  Salt
  1           Teaspoon  Chili Powder
     ½       Teaspoon  Cornstarch
     ½       Teaspoon  Crushed Dried Red Pepper
     ½       Teaspoon  Instant Minced Garlic
     ¼       Teaspoon  Dried Oregano
     ½       Teaspoon  Ground Cumin
Combine all ingredients in a small bowl until evenly distributed.  Spoon mixture onto a 6 inch square of aluminum foil and fold to make airtight.
Label with date and contents.  Store in a cool, dry place; use within 6 months.
Makes one package or about 2 tablespoons.
  "Make a Mix "
Yield:  "1 Package"
Per Serving: 18 Calories; 1g Fat (28.7% calories from fat); 1g Protein; 3g Carbohydrate; 1g Dietary Fiber; 0mg Cholesterol; 2159mg Sodium.  Exchanges: 0 Grain(Starch); 0 Lean Meat; 0 Fat.