Showing posts with label Beef. Show all posts

Small Recipes...Liver and Onions


I have been making this recipe from “Betty Crocker Dinner for Two” since I’ve been married – it comes out perfectly.   I can only buy it locally frozen in packages that serve 4; my husband cuts the package in half for me while still frozen.  Don’t overcook liver, it gets tough as shoe leather – I usually find 10 minutes is enough.
                        Baby Beef Liver and Onions
  2             medium sweet onions -- sliced
     ½         pound  beef liver -- 1/2" slices
                 bacon fat or (lard or shortening)
Peel and slice onions.  Cook in hot bacon fat until golden.  Cover and cook slowly until tender.  Remove to warm plate and keep warm.
Dip the slices of liver in flour.  Brown in hot bacon fat.  Season.  Cook over low heat 10-15 minutes, turning once.  I add a tablespoon or 2 of water before covering.
Serve hot, topped with onions.

Small Recipes...One-Pot Chuckwagon Chow


Here’s a recipe from "Taste of Home Down HomeCooking for 1 or 2" that’s similar to others I’ve made, but it’s great to have it already cut down to just the right size for two.                    
I made it in my 8 inch diameter, number 5 Griswold cast iron skillet.  It’s a twenty-minute meal that’s basically an easy can opener type recipe for me, I already keep frozen chopped onion and pepper in the freezer, and I patty up hamburger for the freezer, and two of them were the right amount for this recipe.  I freeze the leftover beans and tomato sauce flat in freezer bags, and keep them in my use-it-up stash in the freezer.  You can sub in frozen corn or a half can of golden hominy for the corn.  
Serve it with a few crackers and a small side salad and you have a hearty, high-fiber meal in a hurry with no leftovers.  This is one way to use a half can of kidney beans left from Bean and Bacon Salad for 2.  

              One-Pot Chuckwagon Chow  
     1/3       pound  lean ground beef  
  1              small  onion -- chopped 
     1/4       cup  chopped green pepper 
  1              garlic clove -- minced 
  1              can  whole kernel corn -- (7 ounces) drained 
     3/4       cup  cooked or canned kidney beans -- rinsed and drained 
     1/2       cup  tomato sauce 
  1              tablespoon  chili powder 
     1/8       teaspoon  pepper 
In a large saucepan, cook the beef, onion and green pepper over medium heat until meat is no longer pink. Add garlic; cook 1 minute longer. Drain. Add the corn, beans, tomato sauce and seasonings; cover and cook 5-10 minutes longer or until heated through.
Yield:  Makes 2 servings
Each serving:  488 Calories; 17g Fat (30.8% calories from fat); 32g Protein; 54g Carbohydrate; 21g Dietary Fiber; 57mg Cholesterol; 480mg Sodium.

Saturday Thoughts... Good Housekeeping Swiss Steak with Raisins


We had a request from a reader for this recipe today from the 1963 Good Housekeeping Cookbook. 
I have not made this but as it is a lengthy recipe I did not want to put it in the comments. Both Sue and I have been pleased with the recipes from this cookbook so I feel confident in posting it. So for Trina here is Swiss Steak with optional raisins. (The raisins is what she was looking for). If you use cube steak, just flour the cube steak and coat well. Cube steak is already tenderized.
Swiss Steak
1 1⁄2 lb. round steak 1 1⁄2” thick
2 tablespoons flour
1 teaspoon salt
1⁄8 tsp pepper
2 tablespoons salad oil
1 1⁄2 cups canned tomatoes
3 large onions, thinly sliced
1 stalk celery, diced
1 clove garlic, minced
1 tablespoon thick meat sauce (A1, Heinz 57, or similar)
1⁄4 cup light or dark raisins (optional)
Directions:
Trim excess fat from meat. Combine flour, salt, pepper. Lay meat on cutting board; sprinkle with half of flour mixture; with rim of plate or Meat Mallet pound in the flour mixture. Turn meat over and do other side with remaining flour.
In hot oil in heavy skillet over medium heat; brown meat well on both sides - about 15 to 20 minutes.
Add rest of ingredients. Add raisins here if using. Stir well. Simmer, covered about 2 to 2 1⁄2 hours or until meat is fork tender. Skim off fat if necessary.
Makes 4 servings

To vary: Substitute canned tomato or V8 juice for tomatoes
Add diced carrots or celery during last half hour Stir well.


Small Batch Cooking...Frikadeller, also called Bulleten, Bratklops, Fleischpfanzerl


Here’s a recipe my husband loves…I make all of the recipe; shape it into 6 patties and freeze them in 2 patty packages with double waxed paper between the patties.  Then, when I cook them, I cook them from frozen without thawing; about 3-4 minutes on each side.  They are nice and brown and not dry or overcooked on the inside.  That's a fast lunch!
Frikadeller are also Danish and I expect it depends on where you live in Germany as to the choice of names that you call this recipe.
The seasonings in this are traditionally German; if you don’t like them, leave them out; they are still good!  
The original recipe is from The Kitchen Project.com; a website that feature German recipes, I adapted it for a smaller amount.  Myrna and I were raised in a German-speaking community in Minnesota; my husband and I lived in Germany for 5 years; I look through this website and get their newsletters so I can make some traditional recipes I remember enjoying. 
The frikadeller in the frying pan are made with onions and beer; the ones on the plate were simply fried from frozen and served with wild rice and vegetables.  
                 
Frikadeller  
also called Bulleten, Bratklops, Fleischpfanzerl  
  1              slice  stale bread
  2-3          tablespoons milk
     1/2       pound  ground beef
     1/2       pound  ground pork -- or ground turkey
  1             egg
     1/2       onion minced
     1/2       tablespoon  mustard ( your choice)
  1              tablespoon  chopped parsley
     1/8       teaspoon  nutmeg
     1/2       teaspoon  caraway seeds or ground caraway
     1/8       cup  chopped parsley
                  Breading (optional)
     1/2       cup  bread crumbs fresh if possible
Directions:
First you want to soak the bread slices in milk for 30 minutes
then squeeze out excess milk and mush them up. to make your panade into a nice goo.
Add all the ingredients and mix together.  If desired, you can bread them with bread crumbs before frying.  Shape into 4 or 6 patties.
Fry the frikadeller in olive oil and butter, if cooking from frozen, cook 3-4 minutes per side in a covered frying pan.
If desired, cook them with grilled onions and finish with a bottle of beer to make onion sauce.

Saturday Thoughts...Beefy Mushroom Soup


After a Friday morning of appointments, my husband and I stopped by our local family restaurant (where we usually have morning coffee with Myrna) and had a nice “senior” lunch.  After a cup of good soup, we had large servings of “Chopped Steak with Onions”; which was tenderized sirloin with wonderful caramelized onions, and green beans, with peppermint ice cream for dessert.  Neither of us could eat all of our steak, so I brought it home in a sandwich take-out box.  
On that Saturday, one of the coldest here in 2021 so far, I made this soup recipe from “Taste of Home Down Home Cooking for 1 or 2" that I had been looking at.  It calls for cooked roast beef, but I subbed in our chopped steak and the onions as well.  We wanted a little vegetable in our soup too, so I added a half cup of frozen peas to the original recipe.  I used home-canned beef broth and canned mushroom slices as that’s what I had on hand in my pantry.  If you have mushrooms leftover, freeze them to use in another recipe.
We loved it…I’ll make it again. 
                    
                Beefy Mushroom Soup
  1        medium  onion -- chopped
     1/2 cup  sliced fresh mushrooms
  2        tablespoons  butter
  2        tablespoons  all-purpose flour
  2        cups  beef broth
     2/3 cup  cubed cooked roast beef
     1/2 teaspoon  garlic powder (I substituted minced garlic)
     1/4 teaspoon  paprika
     1/4 teaspoon  pepper
     1/8 teaspoon  salt
  1/2    cup frozen peas (optional)
            Dash  hot pepper sauce
            Shredded mozzarella cheese -- optional
In a large saucepan, sauté onion and mushrooms in butter until onion is tender; remove with a slotted spoon and set aside. In a small bowl, whisk flour and broth until smooth; gradually add to the pan. Bring to a boil; cook and stir until thickened, 1-2 minutes.
Add the roast beef, garlic powder, paprika, pepper, salt, pepper sauce and onion mixture; cook and stir until heated through. Garnish with cheese if desired.
Yield:   Makes 3 cups or 2 servings"

Small Recipes...Beef Roast in a Loaf Pan

 This a roast I tried baking in a loaf pan. It was just a few ounces over a pound and I wanted to roast it in my countertop oven. I have a Breville and find I use it for almost everything. I didn’t have a heavy roasting pan that would fit in the oven so decided to try the loaf pan. It of course didn’t have a lid, so I tucked a sheet of Parchment paper down over the roast and then covered the pan with heavy aluminum foil. That did the trick and kept it moist. I did not add carrots or potatoes to it though there was plenty of room to do that with that size of roast. If you do add them to the pan do not add the potatoes till after the first hour so the potatoes don’t get mushy.
 This size roast is just right for one person to eat and have some nice planned leftovers. I cut a roast from the store into three roasts and froze two of them for other meals.
Beef Roast in a Loaf Pan
Directions
 If the roast is boneless tie with kitchen string after trimming off any extra fat. Heat a frying pan adding the fat you trimmed off to get the fat to brown the roast in. 
 Season the roast with salt and pepper and I used some French Thyme, use what ever combination of spices you like. 
 Brown the roast in the frying pan with the rendered fat adding some oil if necessary.
The browning seals in the juices and adds a layer of flavor.
 Place in loaf pan, add some beef broth to the frying pan to deglaze it and pour in the pan. Add more broth till it is ¼ of the way up the roast. Add a bay leaf and some onion if desired. 
 Roast for one hour at 350° and then lower temp to 225° or if you have an oven that has slow cook for an option use it, Cook it for  it for two hours or until tender.
Remove from pan and let set for 10 minutes and then slice. While roast is cooling make some gravy by thickening the pan juices.

 Remainder of the roast can be eaten cold, or freeze it for one or two more meals.

Saturday Thoughts...Pan Fried Steak

Quick and Easy For One 
 Recently our local Fareway Store had New York Strip steaks on sale at $3.99 for 8 ounces I bought ten of them , cut them in 4 ounce pieces and that makes them very affordable. Freeze and take out the night before though they thaw fast in that weight if you forget or change your mind before fixing a meal.
 Sue and I got to talking about how we fixed them without using an outdoor grill. 
 Since I haven’t used one in many, many years I pan fry (grill) mine. The time will depend on the thickness and how rare you like your steak so you might have to try it for a few times before it is to your taste. I like mine just a little rare with the inside at least pink. If you like very rare I would leave them just a little frozen before starting.
 Be sure your frying pan is hot before putting the steak in. In the one in the photo I did it 2 minutes on each side. You want to oil the steak not the pan, that way the seasoning stays on the steak. 
 This is great for a person cooking for one. Bake a potato, fix a small salad, and just before you are ready to eat sear that steak and you are ready to go.
 No recipe as such, just directions.
Pan Fried Steak
 Bring steak to room temperature while your potato is baking and you are making salad.
 Oil steak and sprinkle with your seasonings,(I use salt and pepper and once in awhile
some steak seasoning.) 
 Heat pan to hot, a drop of water will bounce in pan. Add the steak using a tongs so you don’t pierce holes in the meat. Two to Three minutes on each side. Remove from pan to warm plate, pour drippings over steak and let set covered for a few minutes.
Slice against the grain.

Small Recipes... Stir Fry Beef with Peppers

 A Recipe from the cookbook Going Solo in the Kitchen is this Stir Fry Beef and Peppers. A altered version using what I had on hand and the amounts and seasoning from the recipe made a quick supper for one and a half. I do find her recipes are too much for one serving. I either cut back on them or plan on freezing or reheating it for another meal. If you are young and hungry they might be just right. 
 The recipe calls for flank steak but  had a 4 ounce piece of chopped steak and while I had a red pepper I didn’t have any green pepper. To this  mix I added a very small amount of a carrot I had to use and some mushrooms from the freezer. 
 Served it over rice from the freezer which I always have on hand and dinner was done in way less than 30 minutes with enough left for lunch tomorrow or the next day.
 I find it difficult to get a decent photo of something this dark so just know that it is better than the photo looks. I will give you the recipe as it is written, along with the changes I made.
Stir Fry Beef with Peppers
2 teaspoons oil
3 to 4 ounces of steak thinly sliced (I used chopped steak sliced in strips)
¾ cup sliced onion (I omitted)
¾ cup sliced in strips of red pepper 
½ cup sliced in strips of green pepper ( I used half of a carrot cut into strips)
1 Tablespoon regular or Gluten Free Soy Sauce
3 to 4 mushrooms (I usually have in freezer)
Black Pepper to taste

 Heat oil in heavy frying pan, add the steak and cook for 30 seconds over high heat, stirring. Lift the meat out and add the peppers and onion if using. Fry stirring constantly for about 2 minutes. Add the Soy Sauce and Beef stock and mushrooms if using. Cook for another minute or two. Add back in the steak and continue stirring until done. Season with pepper and serve over rice.

Puff Pastry Taco Foldovers

This is an easy version of Tacos we like. It is not as messy and hard to eat as hard shell tacos. The recipe is from the Pepperidge Farm web site.
The taco filling needs to be cool so you could make it ahead even have it in your freezer. The puff pastry needs to thaw for about 40 minutes so you can thaw the taco meat at the same time or make it and cool while the pastry is thawing. Puff pastry is one of those things that you do not need to make from scratch. The store bought dough is good, easy to use and not that expensive.
Taco Foldovers
Ingredients
1 lb. ground beef
Chunky Salsa
1 pkg. (1.25 ounces) Taco Seasoning Mix
Water
1 pkg. (17.3 ounces) Pepperidge Farm® Puff Pastry Sheets (2 sheets)
1 cup shredded Cheddar cheese (4 ounces)
1 egg
1 tbsp. water
Directions
Cook the beef in a 10-inch skillet over medium-high heat until it's well browned, stirring frequently to break up the meat. Add 1 cup of the salsa, taco seasoning and water according to the package directions. Cool completely.

Thaw the pastry sheets at room temperature for 40 minutes or until they're easy to handle. Heat the oven to 400°F. Line two baking sheets with parchment paper or spray with vegetable cooking spray. Stir the egg and water with a fork in a small bowl.

Unfold 1 pastry sheet on a lightly floured surface. Roll the sheet into a 14-inch square. Cut into 4 (7-inch) squares. Repeat with the remaining pastry sheet. Place about 1/3 cup of the meat mixture onto half of each square. Top each with 2 tablespoons of the cheese. Brush the edges of the pastry with water. Fold plain pastry half over meat mixture and press the edges with a fork to seal. Place the rectangles on the prepared baking sheets. Brush with the egg mixture.
Bake for 20 minutes or until golden. Let cool for 5 minutes on a wire rack. Serve warm with additional salsa.

Cutting this recipe in half and just using one sheet is something I do a lot of times, however, they warm up well the next day for lunch. The filling can be frozen if you are going to only use half and then you are ready for the next time.

Blog Withdrawal...and Lunch Today

I don't know what to say...Myrna and I are suffering from "blog withdrawal" already!  We have decided we will post a few times a month with favorite recipes we are making now, or new things we have tried, or when we have something we want to say about equipment, cookbooks, or ideas we have found useful.
That said, here is the recipe I am making for our Sunday lunch today...an old favorite that my husband is delighted I am making more often.


This is a perfect recipe for chuck roast – it was easy, tender and delicious. I have both rosemary and thyme growing in pots, so it was perfect for us.  The baby carrots are just the right size to cook evenly, and you don’t even have to peel them.   If you don’t have wine on hand, try a can of consommé or some good beef broth.  The smaller pieces of beef can be sliced across the grain, making very tender roast.  We served this with homemade mashed potatoes, very, very good!  Pasta, noodles or crusty bread would also make a delicious meal.

Individual Pot Roasts with Herbs and Carrots

Serves 4
1 1/2 to 2 pounds chuck roast
Salt and freshly ground black pepper
Olive oil
1 large onion, diced
4-5 cloves garlic, smashed and roughly chopped
1 1/2 cups red wine or consommé
1 15-ounce can diced tomatoes, with their juices
1 whole sprig fresh rosemary
2 whole sprigs fresh thyme
1 16-ounce bag baby carrots
Heat oven to 325°F. Quarter the chuck roast into 4 equally-sized chunks of meat, like mini pot roasts. Sprinkle lightly with salt and pepper.
Heat a heavy deep pan or Dutch oven over high heat. When the pan is hot, place each piece of the chuck roast in the pan. Sear for several minutes (or until the meat releases easily) on both sides. You may need to do this in two batches; don't crowd the pan. Let the meat get quite dark, with crusty spots on both sides.
When the meat is well-browned, remove it from the pan and put on a plate. Drizzle a little olive oil into the pan and turn the heat down to medium. Add the onions and garlic, and sprinkle lightly with salt. Cook the onions and garlic for about 5 minutes, stirring until they are soft. Add the wine and scrape any remaining bits of meat up from the bottom of the pan. Pour in the tomatoes and bring the mix to a simmer, then turn off the heat.
Add the meat back into the pan. Place the rosemary sprig and whole thyme sprigs in the pot. Cover with a tight-fitting lid and put in the oven. Cook for 1 1/2 hours, or until the meat is very tender.
In the last 30 minutes of cooking,  add the carrots to the pot roast in the oven and cover. Leave the carrots in the pot for the last 30 minutes of cooking the pot roasts (or until tender).
Remove from the oven and let rest for 10 to 15 minutes. Then serve with the carrots on the side.
Adapted from the Kitchn.com

Russian Sheperd's Pie

 Polly Clingerman has three cookbooks published, that I know about and I have all three. The one this recipe comes from is Polly Clingerman”s Dinner Companion.

This is so good and very easy to make. A nice twist on Shepherd Pie the crust is on the bottom and the cottage cheese and swiss cheese make a silky custardy top. Not a true shepherd pie as there are really no vegies except onion more of a egg and cheese type. Either way, great eating. If you use GF biscuit mix it becomes something Celiacs can eat also. However this time I just saved some of the filling and put it in to heat through when I added the swiss cheese. I served this with Harvard Beets to try to keep with the Russian theme.
Russian Shepherd’s Pie
Prep Time: 20 minutes    Cooking Time: 25 minutes
CRUST
2 cups biscuit mix regular or Gluten Free biscuit mix
1 egg slightly beaten
¼ cup milk
FILLING
1 ½ pounds lean ground beef
½ cup chopped onion
½ teaspoon salt
½ teaspoon dry Italian herb mix (check for gluten if you need GF)
¼ teaspoon black pepper
1 clove garlic minced
TOPPING
1 egg slightly beaten 
2 cups creamy cottage cheese (not low fat)
½ cup shredded Swiss cheese
  Preheat oven to 375°
In a skillet over medium heat, brown the ground beef, onion, salt, Italian herbs, pepper and garlic. Drain off any excess fat when the ground beef is brown.
 Meanwhile, in a medium bowl combine biscuit mix, egg and milk. Pat it out to ½” thick and spread it into a lightly greased 9 or 10 inch pie plate. Set aside.
 In a small bowl combine the 1 beaten egg and cottage cheese.
 To assemble, spoon meat mixture into the dough lined pie plate, Spoon the cottage cheese mixed with the egg on top and lightly spread over meat mixture. Bake at 375° for 15 minutes. Top with the shredded Swiss cheese and return to oven, bake 10 minutes more until cheese is melted and the topping is set. Cool slightly and cut into pie wedges and serve.

Meatballs with Cottage Cheese and Ground Beef


Start to Finish
 After making a meatloaf combining ground beef and cottage cheese, I decided that I wanted to make meatballs from the same recipe. The recipe came from a reader of our blog and was in a comment. She/he didn’t post a name with it which is too bad as it is very, very, good. 
  The meatballs are even better than the meatloaf is. I made mine small size, about a tablespoon rounded up. I did use a tablespoon scoop to make them with. If you make them larger keep in mind they will need to bake longer than the time given in the recipe. I am suggesting some seasonings at the bottom of the recipe, feel free to use as many or all of them or use the seasonings from a recipe you already use and like.
 The cottage cheese keeps the meatballs moist and the small size makes them easy to handle. Don’t over mix as that will make them tough. I did drain the cottage cheese but not too dry as I wanted the balls to stay moist.
 Thanks again to our reader and hopefully they will see this and know we all liked them.
Ground Beef Cottage Cheese Meatballs
Ingredients
1 pound ground beef
1 8oz container of cottage cheese (partly drained)
2 eggs
 Mix well with whatever seasonings you are using, if adding onion or celery, dice and sauté for a few minutes so they soften in the short time the meatballs bake. Drain the cottage cheese leaving it still creamy, just not as much liquid, add to meat mixture along with the eggs. 
 Make into 1 tablespoon size balls and place in a pan with sides, lined with greased aluminum foil. Bake at 350° for 16 minutes turning over and draining some of the extra liquid in the pan half way though. If freezing let cool on pan and freeze in a single layer. Once frozen they can be placed in a freezer bag or freezer container.

Suggested Seasonings 
Use as many as you want or all of them
1 small minced onion
1 or more tablespoon chopped green pepper
½ teaspoon ground/powdered Mustard
½ to 1 teaspoon salt
2 to 3 tablespoons ketchup
1 to 2 teaspoons horseradish
2 teaspoons Worcestershire sauce ©
1 teaspoon any herbs
½ teaspoon garlic salt or ¼ teaspoon garlic powder

Creamy Liver and Noodles

We grew up eating liver…our moms thought liver was a wonderful, inexpensive way to get lots of vitamins and minerals.  I can only get it frozen in our market today; but we still enjoy it just as much.
I modified this old recipe from "Southern Living 1980" by adding some mushrooms I had on hand and using some sour cream dip that was on sale that gave it a little extra flavor. 
To make this dish even quicker, I used bacon I had baked, laid out on parchment paper, and frozen.  I poured off the drippings into a covered jar and refrigerated them.  I simply warmed the bacon, and used the refrigerated drippings for sautéing.  Start the water boiling for the noodles first; the liver takes just minutes.
We enjoyed it as a little different, delicious way to have liver, a family favorite.
 Creamy Liver and Noodles
  2 ½      Pounds  Liver -- thinly sliced
  6           Slices  Bacon
  1           Medium  Onion
  1           Cup  Mushrooms -- sliced (my addition)
  1           Cup  Sour Cream -- or sour cream dip
               Hot Cooked Noodles
  2           Tablespoons  Bacon Drippings -- divided
Cook bacon until crisp; drain, reserve drippings.
Sauté liver in half of reserved bacon drippings, 4 or 5 minutes on each side.  Keep warm.
Sauté onions and mushrooms in remaining reserved drippings.  Add sour cream; cook over low heat until just heated through; do not boil, so it doesn’t curdle or cook away.
Spoon mixture over liver; sprinkle with crumbled bacon.   Serve with noodles.
Six Servings

We Like Chili

Clockwise, top left:  Classic chili, Chili Tamale Bake,
Chili Mac, Chili and Hominy

We like chili, but a full recipe makes more than we can eat at one meal.  We’ve found that it freezes well, and we can use the remaining portions for a variety of recipes we also like.  It's a great way to cook for one or two, using it up but not getting bored with it, and it gives a head start on lunch or dinner.
Here’s our favorite recipe, you can easily double it, as well as the recipes that use it.   Use frozen portions, thawed, in Chili Mac, Tamale Bake or Chili with Hominy (hominy tastes like little pieces of cornbread), or over Fritos, (or topped with Fritos); over baked potatoes, over French fries topped with cheese or over hot dogs (Myrna’s favorite).

                        Classic Chili
              pound  ground beef
     1/2       cup  onion -- chopped
     1/4       cup  green pepper
  14 1/2     ounces  canned tomatoes -- diced
  15           ounces  canned chili beans in sauce
  8             ounces  tomato sauce
  1             each  bay leaf
Brown beef, green pepper and onion.
Stir in remaining ingredients except cheese.  Bring to a boil, reduce heat, cover and simmer 20 minutes.  Remove bay leaf.
Serve topped with shredded cheese.
Serve two cups of chili for a meal for two; package remaining chili in two 1 1/2 cup portions in freezer bags for recipes for two.
Yield:  "5 cups"
Per Serving: 264 Calories; 13g Fat (44.5% calories from fat); 14g Protein; 23g Carbohydrate; 7g Dietary Fiber; 39mg Cholesterol; 434mg Sodium. 
                     
 Classic Chili with Hominy
     1/2           cup  canned hominy, drained and rinsed (remainder can be frozen)
  1 1/2           cups  Classic Chili Recipe
Combine, heat together.

Classic Chili Mac for 2
  1 1/2       cups  Classic Chili Recipe 
1 1/2         Ounces  Elbow Macaroni -- or cellentani (1 1/2 ounce)
  1              ounce  cheddar cheese -- shredded
     1/2       cup  corn, whole kernel, canned -- drained (or frozen, thawed)
Cook macaroni, drain and add to hot chili along with corn, let simmer together 5 minutes.  Serve topped with cheese in pasta bowls, with salad and fruit.
                     
Classic Chili and Tamale Bake for 2
  1 1/2       Cups  Classic Chili Recipe
  2  or 4     Canned Tamales -- (freeze remainder of can in a baggie)
  3              Tablespoons  Onion -- chopped
  1              ounce  Shredded Cheddar Cheese
   1             ounce Fritos - crushed (optional)
Pour chili into a greased individual oval casseroles or 3 cup rectangular oven dish. Unwrap tamales and place on top of chili. 
Top with onion and cheese and bake at 350° until bubbling hot, about 20-30 minutes.  Sprinkle on fritos and serve.

Instant Pot Beefy Mexican Rice


Top left: clockwise:  Browning beef and onions, ready to pressure cook, instant pot heating, after final cooking, ready for lunch.

Have you succumbed and purchased an instant pot yet? I finally did, because I like my stove-top pressure cooker and the idea of not even heating the stove in the summer has a certain appeal.   Also, Myrna's review and recipes for her instant pot made me think I would use one.  I especially like mine for cooking rice and making stock, as well as converting recipes I have used in my stovetop pressure cooker, like Swiss Steak.
If you have one, here’s another dish I like to make so I have extra meals for the freezer to use on those busy days.    You can make this a pantry meal by using home canned Hamburger Mix in place of browning the beef and onions.  I use my home canned black beans and home-canned tomatoes too and canned corn.  Use canned red beans or kidney beans instead of black beans if you like, any of them are good, and salsa is a good substitute for the canned tomatoes.  
Use the pantry version for a first day of camping, letting it cook while you set up your campsite.  Heat your dishwater in the pot for cleanup.  
The meal takes about 10 minutes to prep and 20 minutes total cooking time.  (Remember, you can be doing something else while the recipe is cooking, not stirring over a hot stove).   
Try serving with canned green beans, relishes and canned fruit for a 1950's meal like Grandma's.
                   
  Instant Pot Beefy Mexican Rice
  1         tablespoon  olive oil -- optional (depends on how lean your beef is)
  1         pound  ground beef
  1         cup  onion -- diced
  3         teaspoons  chili seasoning mix -- or 1 1/2 tsp. chili powder; 1/2 tsp cumin
  1         cup  long grain rice -- 6 1/2 ounces
  2         cups  water
  2         cups  Stewed tomatoes
  1         cup  black beans, canned -- rinsed and drained
  1         cup  frozen corn – thawed
  1         cup  shredded cheddar cheese -- or 4 Cheese Mexican blend
Heat oil in pressure cooker pot with cooker on Sauté setting.
Add ground beef, onion, seasonings. Cook, stirring and breaking up beef to crumble it, until beef has browned, about 5 minutes.   (Or substitute 2 pints of Hamburger Mix, using the drained liquid for part of the water).
Add rice, water, and tomatoes. Stir to combine. Close and lock lid. Set to high pressure for 8 minutes.
Quick release the pressure and remove lid.
Set cooker to Sauté setting. Add black beans, and corn. Stir to combine. Cook, stirring occasionally, about 3-5 minutes or until beans and corn are heated through.
Top with cheese and serve immediately.
Makes about 8 servings.
To Freeze: Cool, pack 2 servings in quart freezer bags, about 13.5-13.75 ounces each or about 7/8 cup servings per person.  Freeze flat.  
Microwave until hot in a partially covered dish or use plastic wrap with slits in it to cover the dish.  Top with cheese after reheating if desired.

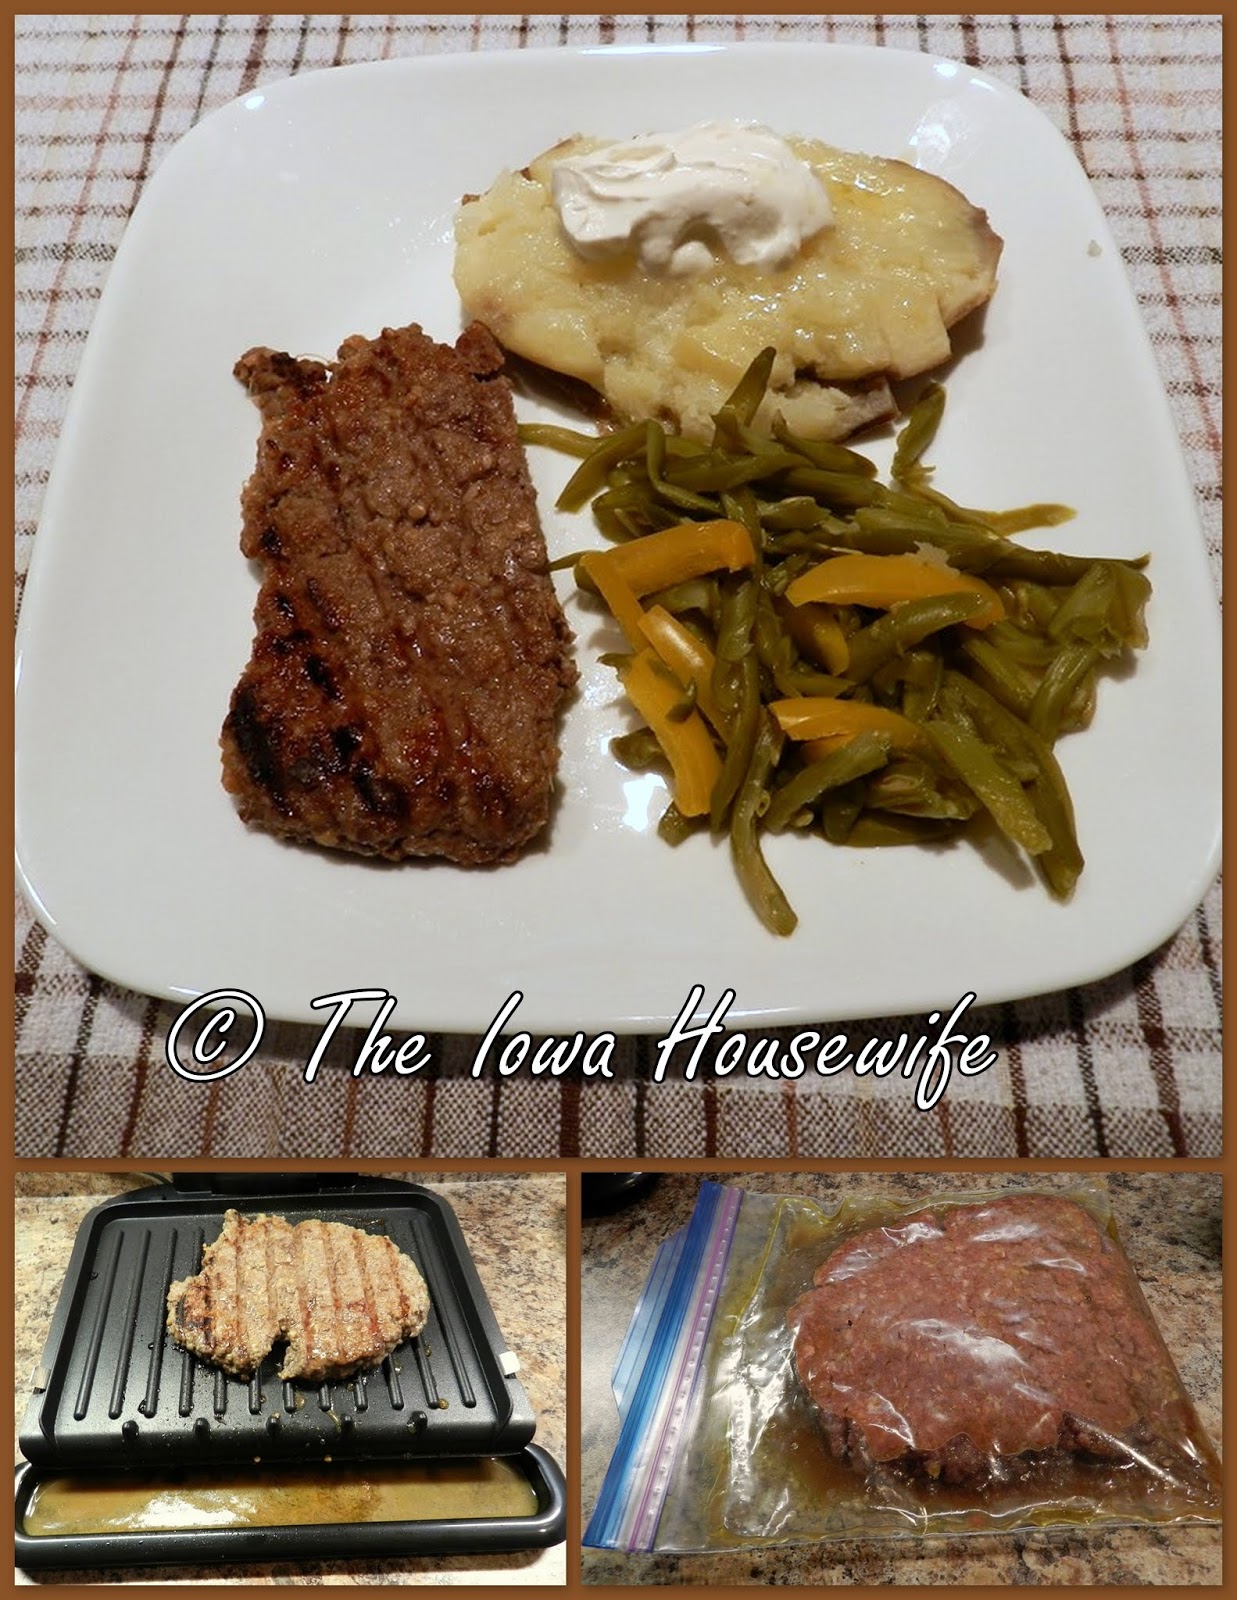
Grilled Minute Steaks on an Indoor Grill


My husband likes these minute steaks from our butcher shop that are so tender you don’t need a knife to cut them.  I like grilling them on my George Foreman indoor grill in a flash!  Here are a couple of recipes I use…they can all be prepared in a grill pan or on your outdoor grill; it takes about the listed time on each side if prepared that way.                     
Sherry and Ginger Grilled Minute Steaks for 2
  8        ounces  minute steak
  2        Tablespoons  Sherry -- or rice vinegar or lemon juice
  1         Tablespoon  Olive Oil
  2          Teaspoons  grated fresh ginger or ginger paste from a tube
  2          Teaspoons  Teriyaki Sauce -- or soy sauce
  2          Teaspoons  sesame oil
  2          Teaspoons  garlic -- minced
Combine all ingredients in a self-sealing plastic bag; seal bag and refrigerate 2-24 hours.
Remove tenderloins from marinade; discarding marinade.  Bring to room temperature 15-20 minutes.
Meanwhile, preheat a George Foreman indoor grill 5-6 minutes.
Place drained minute steaks on grill, cover and cook 4-5 minutes until 145-150° for medium rare.

I like to know what’s in my seasoning salt mixtures so celiacs like Myrna can eat them.  Here’s our favorite, simple recipe that we use a lot.  The seasoning is excellent with eggs, rice, potatoes, meats and poultry.  I keep it on hand.

Sue’s Seasoning Salt on Minute Steaks
Seasoning Salt
  1         tablespoon  salt
  1         tablespoon  onion powder
  1         tablespoon  garlic powder
  1         tablespoon  paprika (we use smoked paprika)
  1         tablespoon  mustard powder
  1           teaspoon  thyme
  1           teaspoon  pepper
     1/2      teaspoon  celery seed
1/2          pound  Minute Steaks, cut into 2 pieces

Stir up ingredients very thoroughly in a 1 cup glass measuring cup.  Pour into a spice shaker or sprinkle with your fingers over both sides of your steak.
Let your steak sit, covered, on the counter 15-20 minutes before grilling, or refrigerated 2-3 hours or overnight after seasoning.  Bring to room temperature if refrigerated, about 15-20 minutes before grilling.
In George Foreman indoor grill, grill about 4-5 minutes for ¾” to 1” minute steaks until 145-150° for medium rare.

To make these meals really fast, I heated up cooked brown /wild rice mixture from the freezer or microwaved a baked potato and served them with frozen vegetables prettied up with frozen chopped garden peppers or frozen, premade caramelized onions, also from the freezer.